RACKET SPORTS WHEELCHAIR TW500

REF: 8771192

ADJUSTABLE HANDBIKE HB500

2023

The adjustable handbike HB500 was conceived to meet the needs of adults and young people wanting to practice hand cycling on tracks and roads. If you have any questions on how to adjust it, maintain it, repair it and all the spare parts you can find to fix it we will guide you through it.

First Usage

Find out the preliminary actions to start using your handbike in all safety.

This handbike is shipped with the two rear wheels removed, the first step is to assemble them into position, using the key supplied with it. The tyres must be inflated at the appropriate pressure, written on the side of the cover.

Check the brakes for any possible malfunctions and make sure that the transmission cables of the shift and the brakes are not twisted.
- To properly inspect the brakes first examine the integrity of each brake component (lever, lining, clamp), then press the brake lever one at a time    to check whether each lever activates the brake clamp.
- To properly check the shift: raise the front wheel with a tripod so that it can turn freely. Move the levers in the direction of travel, activate the   derailleur using the two levers on the right-hand crank and check whether each gear change corresponds to the relevant adjustment of the  derailleur (you can feel whether the pedalling movement becomes more difficult or easier depending on the direction given).

A couple of final examinations are in order before you are ready to race towards new adventures:
Check the bell and the safety lights, if everything is fine, you are ready to go.

The handbike HB500 is shipped with the default setup but it adjusts to multiple users’ needs. Here are all the possible adjustments you can perform and some how-to video to guide you toward the best configuration
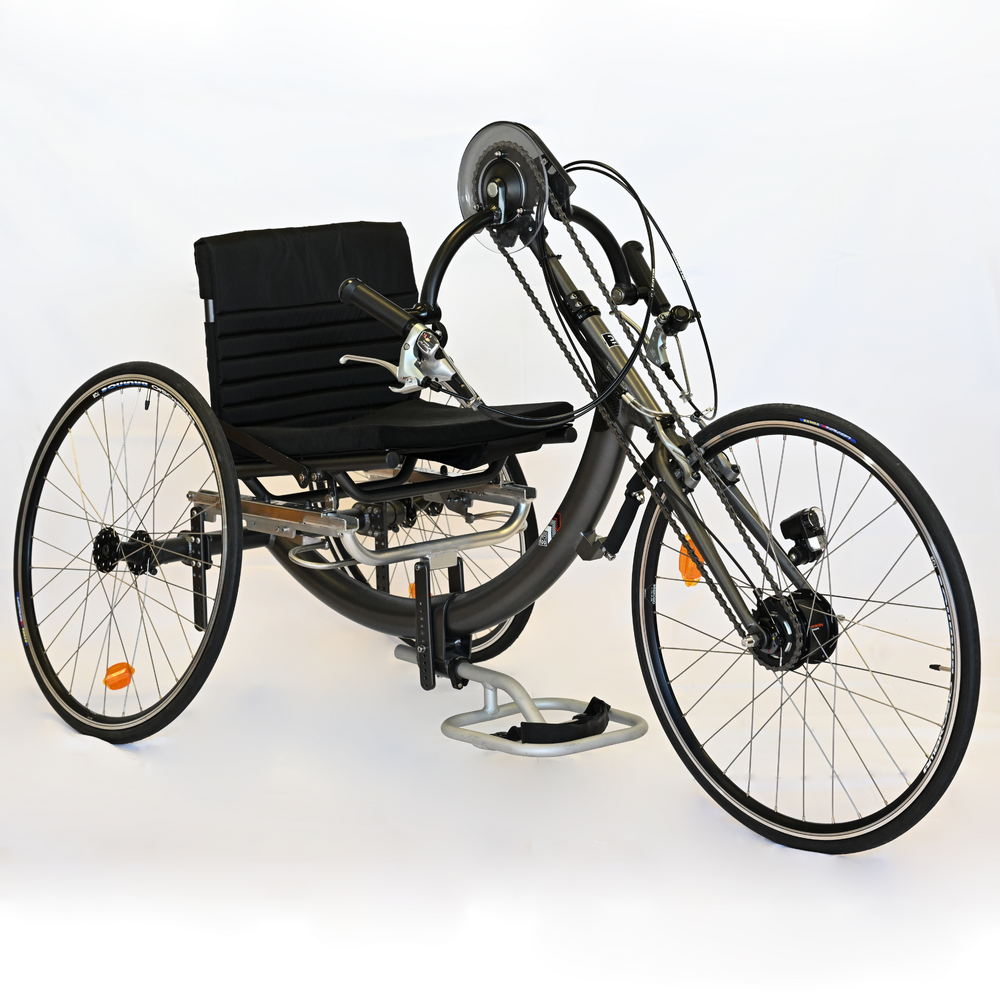
Adjusting the front seat height

The handbike is shipped with a front height of 50 cm related to the ground. The regulation of the front seat is the only way to adjust the distance relative to the footplate. We, therefore, recommend verifying that this distance is comfortable immediately after selecting the desired seat inclination and adjusting the rear height consequently.

The distance between the seat and the ground can vary from 50 to 60 cm with 1 cm steps.

Adjusting rear seat height

The height of the rear seat in relation to the ground can be adjusted by unscrewing and readjusting some screws.

The distance between the seat and the ground can vary from 42 to 58 cm (1 cm step). 

Adjusting the seat inclination

The seat angle can be adjusted via two plates on either side of the seat, this adjustment must be performed on each side at the same time.

Adjusting the tautness of the backrest canvas

The backrest canvas tautness can be adjusted by loosening the straps and pulling them to the desired tension with the user in playing position.

Adjusting the footrest height and depth

Both adjustments are possible on the handbike HB500.

Download the user manual to see a step by step istructions

Adjusting the backrest incline

The backrest is shipped with a standard angle of 91°, which can be modified in two or three selected angles by removing and replacing the holding screws. Make sure that the screw positions on the plates are the same on both sides.

Have a problem?

I need to set up the pelvic strap

No problem! The aluminium frame of the hand bike HB 500 can accommodate a 45° pelvic strap by adjusting it on the backrest bar.

How to set uo the pelvic belt on your handbike
I need to change the tyre or the air chamber of my wheelchair

(unluckily) you found a hole in your tyre or after the routine checks you found out that your tyres are worn out and you need to replace one or both of them? Don’t worry, here’s a tutorial on how to change your wheelchair tyres:
1. Deflate the tyre
2. Insert a lever between the circle and the shoulder of the tyre, so that when the lever is tilted, the side of the wheel comes out
3. Install another lever 1 cm from the previous point and repeat the opera on
4. Slide the two levers around the whole circle to release the entire tyre.
5. Remove the air chamber, starting with the side opposite the inflation valve
6. Once the air chamber has been removed, you can easily remove the tyre to replace just one or both of them.


Aaand you completed the first step now we need to put everything back in place: here’s a tutorial on how to re-assemble the air chamber and tyre:

1. Insert the air chamber inflation valve into the hole intended for this purpose, located on the circle.
2. Around the whole circle, install the tyre, taking note of the direction of the tyre, which indicates whether it's the right or left wheel.
3. Install the opposite shoulder over the tyre, starting from the point where the valve is, moving around in both directions.
4. Insert the final part of the shoulder with the help of the levers intended for this
Inflate the tyre to the pressure indicated on its side.

I need to change the tyre or the air chamber of my wheelchair
I need to replace the bearings

Disassembly
The drive wheel bearings (6001 2RS) are mounted by applying pressure. To remove them, you simply need to push them from the inside, using a pin drift and a hammer.
Assembly
Position a new bearing on the inner side of the hub, taking care to insert it evenly (it must be co-axial with the hub, otherwise it won't go in).
Before positioning the bearing, on the opposite side, you need to insert the quick removal axle into the bearing which has already been inserted, so that the axle itself acts as a guide for the two bearings. This way, you make sure that the hub and two bearings are co-axial.

RACKET SPORTS WHEELCHAIR TW500

General Maintenance

Weekly maintenance
Every week you should perform a couple of basic checks to assure and dilate the lifespan of your handbike
- Check the tyre pressure: tyres should be inflated to the pressure indicated on their side
- Check the efficiency of the brakes
- Check that the gear and brake cables are not entangled
Tri-monthly maintenance
Once every now and then you should perform a more accurate check on your handbike
- Check the wear of the tyres
- Ensure that the rear wheel bearing bolts are properly tightened
- Verify the efficiency of the bearings on the front and rear wheels and lubricate them if necessary. We recommend using silicon oil as a grease, as it's effective and non-staining.
- Check the position of the gear shift and its correct functioning

General maintenance
Store your handbike a in a clean and dry place to avoid rusting and corrosion, especially if you store it for a long period.

Cleaning
To properly clean your handbike we advise removing the seat and backrest canvas before starting the operations, the padding can be washed at low temperatures.

Always clean the handbike thoroughly for maximum efficiency, avoid immersing the mechanical parts of the handbike in water but wash it with a damp cloth, using warm water and neutral soap to remove dirt or stains and then rinse it with a damp cloth to remove any traces of the detergent.
Make sure the handbike is completely dry before you store it.

Spare parts and compatible accessories

Need to change one of the parts on your handbike?
Here you can find the available spare parts to repair your handbike and the compatible accessories.

User guide

Here you can download the user guide of the Handbike HB500 with all the information and detailed instructions for everything you might need. We recommend always reading it through.