RS520E

REF: 8735614, 8735615

RIVERSIDE 520e

2022

Need help with assembling, maintaining, repairing or finding an accessory for your bike?

Here you will find tutorials and videos that will show you how step by step.

You can also download the CE declaration of conformity for your bike.

CE CERTIFICATE AND USER GUIDE

assembly video

ASSEMBLY VIDEO

First use

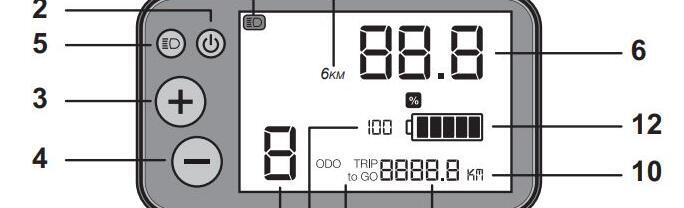
1 - "Assistance mode button" (0-1-2-3)

- "0": no assistance
- "1" is the default assistance mode: +50% assistance
- 2: +100% assistance
- 3: +150% assistance

2 - "ON/OFF" button

- Press and hold to turn the bike on and off
- Short press to scroll through the ride info (Trip, Odo, Triptogo)

3 - "+" button

- Short press to switch to the next assistance level up (3 being the maximum)
- Press and hold to switch to "walk mode"

4 - "-" button

- Short press to switch to the next assistance level down
- Press and hold (5-10 sec) to reset the partial distance counter (TRIP) to zero

5 - "Lights" button

- Short press to turn on the front and rear lights and the screen's backlight
- Press and hold to go into settings

6 - "Speed indicator"

7 - "Walk" mode

Lets you push the bike along as you walk, up to a maximum of 6 km/h, without pedalling.
Please note: this mode should not be used when riding your bike

8 - ODO TRIP

ODO: Total distance counter. It cannot be reset to zero.
TRIP: Partial distance counter.
TRIPtoGO: The remaining distance that the bike can cover in the current assistance mode.

9 - Distance indicator

10 - Units: kilometres or miles

11 - Lights indicator: appears on the screen when the lights are turned on

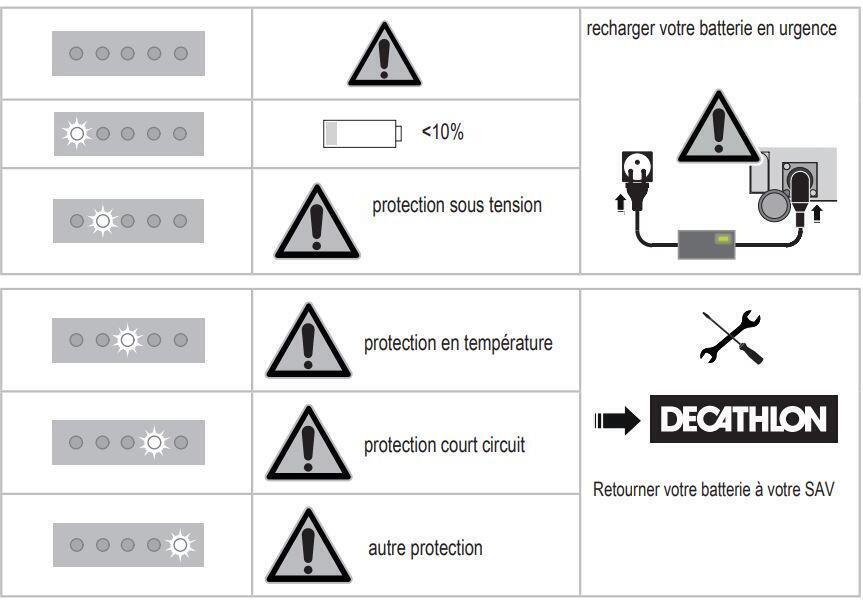
12 - Five battery levels: when the battery level is low, the indicator will start flashing

13 - Additional battery and system information
Gives the battery charge level as a percentage

RIVERSIDE 500e ⎟GREY - GREEN⎟2020 - 2021

Checking the condition of your bike

Remember to check the condition of your bike before each ride.

FRONT WHEEL: HOW TO REMOVE IT PROPERLY

Your bike is equipped with a wheel with a quick-release mechanism. Please watch the first part of the video for instructions.

WARNING: if your rear wheel is loose, come and see us in the workshop!

BRAKES: adjusting cable-actuated disc brakes

Check that your brakes are working correctly. If you feel that they aren't powerful enough, try adjusting them with the help of our video tutorial.

If you're still having problems, come and see us in one of our workshops!

BRAKES: BEDDING IN IS ESSENTIAL!

When you first get your bike from the store, the brake pads and discs are brand new and therefore the initial braking performance is very low (weak).

A sharp, prolonged braking action (for example, during a descent) with brakes that have never before been used can cause the pads to overheat and to "glaze over".

To prevent this from happening (which could make them unusable), we recommend that you bed them in. This takes about 10 braking actions per brake. For each braking action: apply a single brake to slow the bike down from about 25 km/h to 5 km/h without fully blocking the wheel. Repeat with the other brake.

RIVERSIDE 100e

TYRES: HOW TO INFLATE THEM CORRECTLY

The tyre pressure is something you should check regularly on an electric bike. The wheels have a lot of weight on them because of the combination of the motor and bike.

To reduce the risk of punctures and ensure your bike can achieve its maximum range, we recommend inflating your tyres to a pressure of 4 to 5 bars.

CABLES

Check that your different cable housings aren't damaged and that they're well-positioned.

If you see a damaged housing (for example, if you see the metal cable), change it as soon as possible.

Visit a workshop so that our mechanics can repair your bike!

SADDLE: HOW TO ADJUST THE HEIGHT CORRECTLY

Adjusting your saddle to the correct height will prevent pain.

Safety

We recommend wearing a helmet and gloves while riding. Because anyone can take a tumble... 

RIVERSIDE 500e ⎟GREY - GREEN⎟2020 - 2021
Battery

Make sure your battery is locked in place and that you have enough charge for your journey.
Don't ride your bike with the battery's key in its lock.

STORAGE

> Store your bike in a place that is cool and sheltered.

> Before you put it away, clean your bike to remove mud or sand that could corrode your bike.

> Lubricate the chain as described in the "maintenance" section.

> Put the derailleur on the small cog

> Charge the battery at least once every six months (the more often, the better).

GET STARTED WITH YOUR FIRST BIKE TOUR

SETTING OUT ON A CASUAL RIDE OR LONGER TOUR ON YOUR RIVERSIDE BIKE?

Here are a few tips for you:

1- SAFETY

Wear a certified helmet, purchased recently; remember that the head is impacted in one out of every two falls!!
IMPORTANT: Helmets have a limited effective lifespan, even if they haven't been involved in a crash! Find out more when making your purchase.
 - Set off with a bike that is properly adjusted and well maintained.
- Take your phone (fully charged!) to make a call should you need help.
- Map out your route ahead of time so you can take bike trails and paths that are free of cars as much as possible.
- Take a first aid kit (in a bag under the saddle, for example)
- If you'll be riding in the dark, make sure you have front and back lights mounted and operational. 

2- COMFORT

- If you're just getting started with cycling: Start with one-hour rides and gradually lengthen them as you gain experience.
- Wear clothing that is appropriate for the length of your ride, plus gloves.
- Don't try to push hard on the pedals. Instead, switch gears so you can pedal more easily and faster. You'll be able to go further for longer.
- Depending on the weather, bring along clothing to protect you from the cold or rain.
- Don't forget to do some stretches after your ride.
- STAY HYDRATED!! 

3- ALWAYS TAKE A TYRE REPAIR KIT WITH YOU!

 - A tyre pump. Some pumps will fit onto the frame's bottle cage bolts.
- 3 tyre levers, one inner tube, a Riverside 100 15 mm spanner, which you can fit into a saddle bag. 

 4- DRINK REGULARLY

- Attach a bottle cage to your bike so you can drink as you ride, or carry a water bottle in a backpack.
- Remember to drink water regularly (every 20 minutes and at least half a litre per hour).

5- REMEMBER TO EAT

- Take some energy bars with you (you can carry them in a saddle bag or handlebar bag)
- Don't wait until you feel hungry to eat. Eat every hour to fuel your muscles.

RECHARGING THE BATTERY

HOW LONG DOES IT TAKE THE BATTERY TO CHARGE?

It takes 7 hours to charge the battery fully (from 0% to 100%). However, it only takes 3 hours to charge the battery from 0% to 70%.

Charger
CAN YOU RIDE WHEN YOUR BATTERY IS FLAT?

It's an electrical assistance bike. That means it's entirely possible to ride without this assistance.

However, you may well notice the additional weight of the assistance system.

CAN YOU LEAVE THE CHARGER CONNECTED TO THE BATTERY EVEN IF IT'S FULLY CHARGED?

Yes, the charger and the battery are designed to be plugged in 24 hours a day.

When the battery is fully charged, the charger stops charging. You can tell when it is charged because the LED will turn off.

SHOULD YOU WAIT UNTIL YOUR BATTERY IS COMPLETELY FLAT BEFORE CHARGING IT?

No. Lithium-ion batteries have no memory effect. So they can be charged at any time.

To make your battery last longer, it is recommended that you don't let it drop below 20% charged.

Battery, lifespan, storage & range

WHAT SHOULD YOU DO WITH THE BATTERY WHEN IT WEARS OUT?

When your battery wears out, take it to your local Decathlon store, which will send it to a specialist facility to be recycled.

WHAT IS THE LIFETIME OF YOUR BATTERY?

The warranty on your battery is for 2 years or 500 cycles (1 cycle = 1 full charge + 1 full discharge, or two 50% charges + two 50% discharges).

HOW SHOULD YOU STORE YOUR BATTERY?

You must store and charge your battery in a cool (between 10°C and 25°C), dry place, out of direct sunlight.

To avoid deep discharge, which may cause it to malfunction, do not put the battery away when less than 10% charged.

If you aren't using your battery for more than 3 months, it should be charged to 70% when you put it away.

Remember to recharge the battery at least every 6 months, even when not in use, to prevent deep discharge which can diminish the battery’s capacity.

WHERE TO BUY A SECOND BATTERY

You can buy a new battery with a different capacity from your local Decathlon workshop.

Contact your nearest workshop to check on availability and order times.

HOW LONG CAN YOU STORE YOUR BATTERY BEFORE YOU NEED TO RECHARGE IT?

You can store your battery for up to six months without recharging, without degrading battery capacity. If storing it for longer than six months, you must first charge it to 70%.

WHAT IS THE RANGE OF THE RIVERSIDE 520e?

Your electric bike's range depends on a number of factors:

> THE BIKE'S LOAD: The range will be reduced if the bike is carrying too much weight.

> THE ROUTE: The range is reduced on climbs.

> HOW YOU RIDE THE BIKE: The range depends on how much effort you expend when pedalling.

> THE TYRE PRESSURE: The battery life will be better with tyres inflated to between 4 and 5 bars.

> THE OUTDOOR TEMPERATURE: The range is reduced in colder weather.

> THE POWER ASSIST MODE: We recommend reducing the assistance mode when the battery is running low.

> FOLLOWING THE INSTRUCTIONS FOR CHARGING AND STORING YOUR BATTERY.


The Riverside 520 E's estimated battery range is 100 km in mode 1, 90 km in mode 2, and 60 km in mode 3 when the instructions are followed correctly.

Battery life

THE BATTERY LIFE IS LOW OR HAS GONE DOWN

1. Make sure you follow the recommendations for using and storing your battery.

Your electric bike's range depends on a number of factors:

> THE BIKE'S LOAD: The range will be reduced if the bike is carrying too much weight.

> THE ROUTE: The range is reduced on climbs.

> THE OUTSIDE TEMPERATURE: The range is reduced in colder weather (by up to 50%).

> THE POWER ASSIST MODE: We recommend reducing the assistance mode when the battery is running low.

> FOLLOWING THE INSTRUCTIONS FOR CHARGING AND STORING YOUR BATTERY.


2. An old battery can have reduced performance.

As they age, batteries lose some of their range. Visit your Decathlon workshop to give your battery a check-up.

COMPATIBLE ACCESSORIES

  • RIVERSIDE 520e

    Our full range of accessories that are compatible with the Riverside 520 E

MECHANICAL TROUBLESHOOTING

YOUR WHEEL IS BUCKLING AFTER SEVERAL RIDES

When you take your new bike out for a ride for the first time, a lot of parts can shift and fall into place.

You'll hear the spokes on your wheels creak because of the residual torsion in them from the assembly process; this is normal.

Your wheels should not buckle or be twisted in any way. If this does happen, use the free check-up available to you within six months of purchase and call in at one of our Decathlon workshops to have your wheel repaired free of charge.

WheelBuckling
YOUR GEARS ARE NOT SHIFTING PROPERLY

There could be several reasons why your gears (cogs) are not shifting correctly.

1. Check the position of the cable housing end caps (tips). Incorrectly positioned cable housing caps can hinder the pulling action on the derailleur cable and cause the shifting of the gears to be off. If a housing end is out of position, push it back into place.

2. The cable and housing might be jammed. If you can't shift into the smallest gears (onto the smallest cogs), and if the derailleur doesn't move even when the gear shifter is operated, then the cable and the housing have probably jammed up. In this case, the cable and housing need to be replaced.

3. Take your Riverside to a Decathlon workshop to have your derailleur adjusted.

4. Also check that the derailleur hanger is not bent. If it is, check the "DERAILLEUR HANGER IS BROKEN" section.  

NB: If you regularly ride your Riverside in wet or muddy conditions, or if you regularly wash your Riverside bike with a lot of water, then your cables and cable housing will need to be replaced more frequently. Washing your bike using a pressure hose is highly discouraged as it can push dirt and dust into the cable housing.

Riverside500e derailleur
REPAIRING A FLAT

Before putting on a new inner tube, have a quick feel inside the tyre to make sure there's nothing sharp still stuck to the inside.

LOST KEY

You can make a copy of your key at any locksmith.

If you have lost both keys to your bike, please visit a Decathlon workshop to have the lock on the bike changed.

You'll be given two new keys to go with the new lock.

keys
THE FRAME HAS CRACKED OR BROKEN

We provide a lifetime warranty on your bike's frame, stem and handlebar.

This warranty applies to normal use of your bike. Your bike is designed for regular cycling on roads and paths. If you use your bike for mountain biking and the frame cracks, the warranty will not apply. Likewise, if you position the seat post too high, the frame could break.

The details of your warranty can be found at the link below.

ELECTRICAL TROUBLESHOOTING

YOUR BATTERY WON'T CHARGE

1. CHECK THE BATTERY > CHARGER > MAINS SOCKET CONNECTION


Make sure the charger you are using is an original one provided by Decathlon.

Plug the charger into the battery and into a mains plug.

Charger light is red: the battery is charging.

Charger light is green: the battery has finished charging.

Flashing charger light: the battery or charger has a problem.

A completely drained battery will take 6 hours to charge fully.


2. CHECK THAT THERE IS NO DIRT PREVENTING CHARGING

The charger's and the battery's connectors should be clean. There should be no dirt preventing contact between the battery and its charger.


3. THE LED INDICATORS ON THE BATTERY MAY BE FAULTY

Visit your Decathlon workshop to have them repaired.

ONE OR MORE LEDS ON YOUR BATTERY IS/ARE FLASHING

NO LEDS ARE FLASHING

Your battery is almost flat and needs to be charged. Plug your battery into the charger.

THE FIRST LED ON THE LEFT IS FLASHING

Your battery is almost flat and needs to be charged. Plug your battery into the charger.

THE SECOND LED ON THE LEFT IS FLASHING

Your battery's voltage is low and it has not been charged for a long time. Charge it as soon as possible to prevent it from going into a deep discharge state and becoming unusable.

ONE OF THE LAST THREE LEDS IS FLASHING

A malfunction has occurred triggering an error. This malfunction may be temporary or permanent. Please visit any Decathlon workshop to have diagnostics run on your battery and bike.

LED battery
THE ELECTRIC ASSISTANCE IS INTERMITTENT

1- CHECK THAT THE BATTERY IS CHARGED

If the battery is almost empty and the bike is set to a high assistance mode, this can cause the bike to judder before the battery goes completely flat.

> Remove the battery from the bike.

> Press the battery button.

> Check that at least one LED lights up.

> If none of the LEDs light up, or the last LED flashes, charge the battery.

2- CHECK THAT THE BATTERY IS CLEAN, PROPERLY ATTACHED, AND LOCKED IN PLACE

> Check that the battery connectors and housing are clean and in good condition.

> The battery should be correctly inserted into its slot. (Remember to put the lock into the open position)

3- CHECK THAT THE MOTOR CONNECTOR IS PLUGGED IN CORRECTLY

> The motor plug, which is located on the frame's back left stay, may be slightly out of place.

Simply push it in so that it is fully in place (the male connector shouldn't be poking out at all). This should stop the engine noise and juddering.


If the problem persists, please contact us through the contact form, or visit a Decathlon workshop.

The screen won't turn on

1- CHECK THAT THE SCREEN IS PROPERLY PLUGGED IN

> Check the screen's connector, which can be found on the front of the handlebar.

> Loosen the two knobs and pull to disconnect the console from the connector cable.

> Check that none of the plugs are bent.

> Reconnect it, taking care to orient the connectors correctly to avoid bending a plug! Use the two arrows etched into each side of the connectors to check the orientation. These two arrows must be lined up face to face before being plugged in.

2- CHECK THAT THE BATTERY IS PROPERLY CHARGED

If the battery is almost empty and the bike is set to a high assistance mode, this can make the bike judder, before the battery goes completely flat.

> Remove the battery from the bike.

> Press the battery button.

> Check that at least one LED lights up.

> If none of the LEDs light up, or the last LED flashes, charge the battery.
3- CHECK THAT THE BATTERY IS CLEAN, PROPERLY PLUGGED IN, AND LOCKED IN PLACE

> Check that the battery connectors and battery housing are clean.

> The battery must be correctly inserted into the lower slot and the handle must be fully down (you should hear it click to confirm that it's in correctly).

4- LET THE SYSTEM COOL DOWN

In high temperatures, or after a long ride, the electric system may overheat. Allow the bike to cool down by not using the electrical assistance for several minutes, then turn it back on.


If the problem persists, please contact us through the contact form, or visit a Decathlon workshop.

THE ELECTRIC ASSISTANCE IS CUTTING OFF

1- CHECK THAT THE BATTERY IS CHARGED

If the battery is almost empty and the bike is set to a high assistance mode, this can cause the bike to judder before the battery goes completely flat.

> Remove the battery from the bike.

> Press the battery button.

> Check that at least one LED lights up.

> If none of the LEDs light up, or the last LED flashes, charge the battery.
2- CHECK THAT THE BATTERY IS CLEAN, PROPERLY ATTACHED, AND LOCKED IN PLACE

> Check that the battery connectors and housing are clean and in good condition.

> The battery should be correctly inserted into its slot. (Make sure the lock is in the open position)

3- LET THE SYSTEM COOL DOWN

In high temperatures, or after a long ride, the electric system may overheat. Allow the bike to cool down by not using the electrical assistance for several minutes, then turn it back on.


If the problem persists, please contact us through the contact form, or visit a Decathlon workshop.

THE ELECTRIC-ASSIST DOESN'T ENGAGE

1- SELECT AN ASSISTANCE MODE (ECO, NORMAL, BOOST)

If no mode is lit up, this usually means there is no electrical assistance.

Select one of the assistance modes (ECO, NORMAL, BOOST).

Once the mode is selected, start pedalling, pressing firmly on the pedals.  Select a higher assistance mode (BOOST is the highest) if you find it too difficult to pedal hard enough to engage the electrical assistance.

2- CHECK THAT THE BATTERY IS CHARGED

If the battery is almost empty and the bike is set to a high assist mode, this can cause the bike to judder before the battery goes completely flat.

> Remove the battery from the bike.

> Press the battery button.

> Check that at least one LED lights up.

> If none of the LEDs light up, or the last LED flashes, charge the battery.

3- CHECK THAT THE BATTERY IS CLEAN, PROPERLY ATTACHED, AND LOCKED IN PLACE

> Check that the battery connectors and housing are clean and in good condition.

> The battery must be correctly inserted into the lower slot and the handle must be fully down (you should hear it click to confirm that it's in correctly).

4- LET THE SYSTEM COOL DOWN

In high temperatures, or after a long ride, the electric system may overheat. Allow the bike to cool down by not using the electrical assistance for several minutes, then turn it back on.

5- CHECK THAT THE MOTOR CONNECTOR IS PLUGGED IN CORRECTLY

The motor plug, which is located at the rear stay on the left of the frame, may be slightly out of place.

Simply push it in so that it is fully in place (the male connector shouldn't be poking out at all). This should stop the engine noise and juddering.


If the problem persists, please contact us through the contact form, or visit a Decathlon workshop.

THE ELECTRICAL ASSISTANCE ISN'T VERY EFFECTIVE

1- CHECK THE TYRE PRESSURE

> The tyre pressure determines how efficiently the electric assistance works. Before each ride, make sure your tyres are inflated to between 4 and 5 bars.

2- CHECK THAT THE BATTERY IS CHARGED

If the battery charge level is low, the motor won't receive enough power to deliver the desired assistance level. In this case, switch to a lower electrical assistance mode.

3- CHECK THAT THE BATTERY IS CORRECTLY PLUGGED IN

If the motor seems to judder, check that the connector to the motor is fully and securely plugged in.

The motor plug at the top of the frame's left rear stay could be disconnected or damaged.

Simply push it in so that it is fully in place (the male connector shouldn't be poking out at all). This should stop the engine noise and juddering.

4- BE CAREFUL NOT TO OVERLOAD THE BIKE


If the problem persists, please contact us via the contact form, or visit your local Decathlon workshop.

RIVERSIDE 500e

Maintenance

Servicing your Riverside 520E will keep all of its parts working for as long as possible and ensure you have the most fun when riding. Failing to maintain your bike can lead to problems such as jammed cables, rust, leaks, premature wear, and more.

Your bike's parts will also last longer, which means a lower environmental impact.

As soon as you start using the bike, some components will move slightly.
This is why we offer a free check for your bike 6 months after purchase. 

Spring cleaning

It's a good idea to clean your bike thoroughly from time to time. Here's a step-by-step guide on how to give your bike a deep clean. The more frequently you ride, the more often this type of cleaning is recommended.
When cleaning your Riverside 520 electric bike, leave the battery mounted on the bike. This will help prevent water from getting into the electric controller.

Over the course of your bike's lifetime, as you put miles on it, you'll need to replace certain parts for safety reasons and to ensure everything works smoothly.

Every 100 km: Clean the chain and lubricate the drive train.

Every 1000 km: Check the brake pads and, if necessary, visit your local Decathlon workshop to have them replaced or do it yourself with the help of our tutorial.
Check your tyres or replace them by following our tutorial.
Every 5000 km: Have your chain and rear wheel cogs replaced (visit the nearest Decathlon workshop).

HOW TO DEGREASE YOUR DRIVE TRAIN

How to degrease your bike chain
In order to properly degrease your chain, it's important to spray a degreasing product on the entire chain and drive train. Then, wipe the chain and the cassette with a clean cloth to remove grease and dirt. Depending on the general condition of your chain, be sure to clean any particularly dirty parts thoroughly!
Lastly, rinse it abundantly until you've removed all the residue. Sometimes, even after spraying with cleaning product, some dirt might still remain.
So finish by letting it sit for a few minutes before wiping your chain down again with a dry cloth to fully remove any remaining residue.

To perform this task more efficiently and for a cleaner chain, we recommend using our chain cleaner.

RIVERSIDE 500e
REPLACING THE BRAKE PADS

After replacing your brake pads, we recommend bedding them in so that they don't "seize up" (which would cause weaker braking power).

HOW TO CHECK FOR TYRE WEAR

Riding a bike with worn-down tyres can cause problems, including loss of traction, flat tyres and falls. To reduce the chance of these, here are some tips on how to check the wear on your tyres.

RIVERSIDE 500e
REPLACING YOUR TYRE

Your tyre might be quite rigid if it is old; it's okay to use some force to get it off.

HOW TO REPLACE YOUR CASSETTE

Simply unscrew the cassette using the lockring tool and chain whip, then screw on the new cassette.

You'll find the lockring tool and chain whip at the link below; for a new cassette, please check the "Spare Parts" section.

REPLACING THE CHAIN

To do this, you will need: a chain tool, a new chain, and a quick-link.

Place the chain on the last cog and on the smallest chainring. 

Remove the quick-link using the pliers or chain tool, then take the old chain off the drive train.

Place the new chain on the last cog and on the smallest chainring. This will make it easier to determine its optimal length.
IMPORTANT: certain chains only fit in 1 direction, so be sure to check the user guide.

The chain should pass close to the top pulley of the upper jockey wheel on the derailleur.

Once you've determined the correct length, use the chain tool to cut the chain.

Lastly, install the quick-link onto the chain, turn the pedal so as to position the quick-link on the upper part of the chain, and use your hand to apply pressure and ensure it is firmly locked in place.

Need equipment to repair or maintain your bike? Here are the essentials.

CHAIN

SPARE PARTS

NEED SPARE PARTS FOR YOUR RIVERSIDE 520E?

RIVERSIDE 100e

Contact form

Can't find an answer to your question?

Fill out this form and one of our advisers will get back in touch.

RIVERSIDE 500e

OUR WORKSHOP SERVICES

Repair your bike in store or right at home! Our qualified mechanics would be happy to help with your bike.

RIVERSIDE 500e

OUR
COMMITMENT

Riverside is committed to reducing the carbon emissions from manufacturing its bikes as much as possible.
Each part is designed to have the lowest carbon footprint possible.

We provide a lifetime warranty on the frame, stem and handlebar.