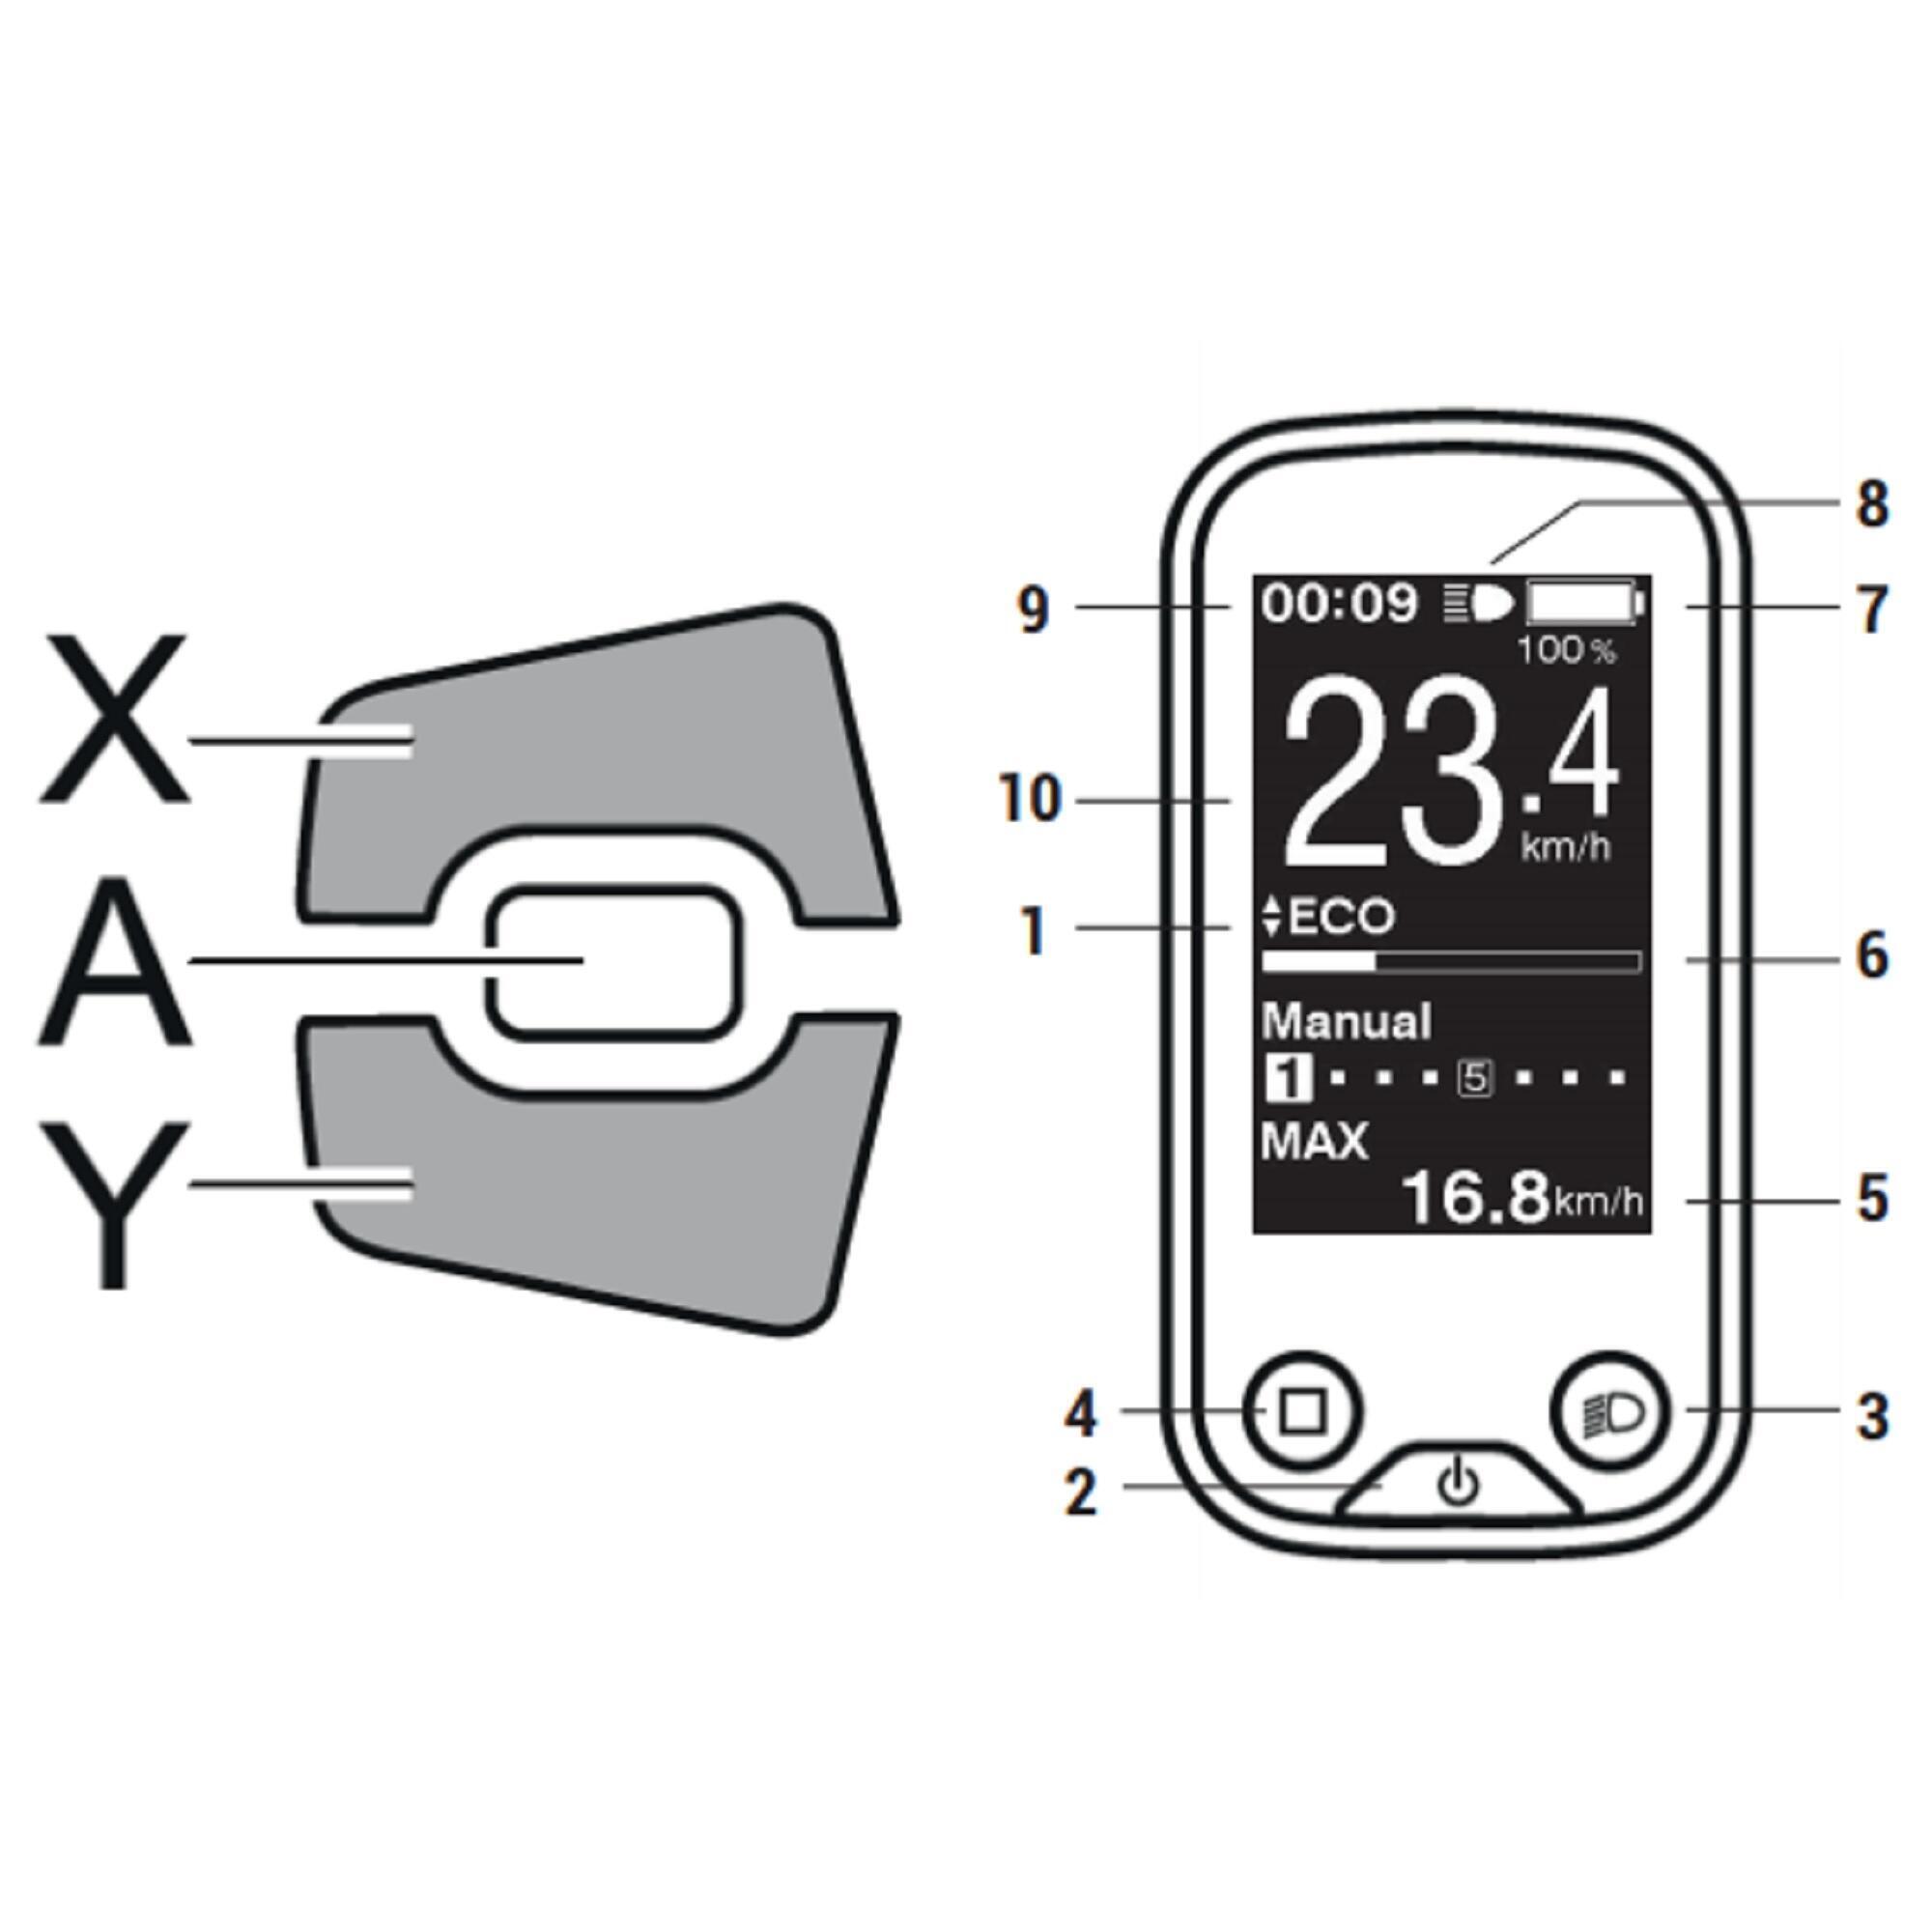
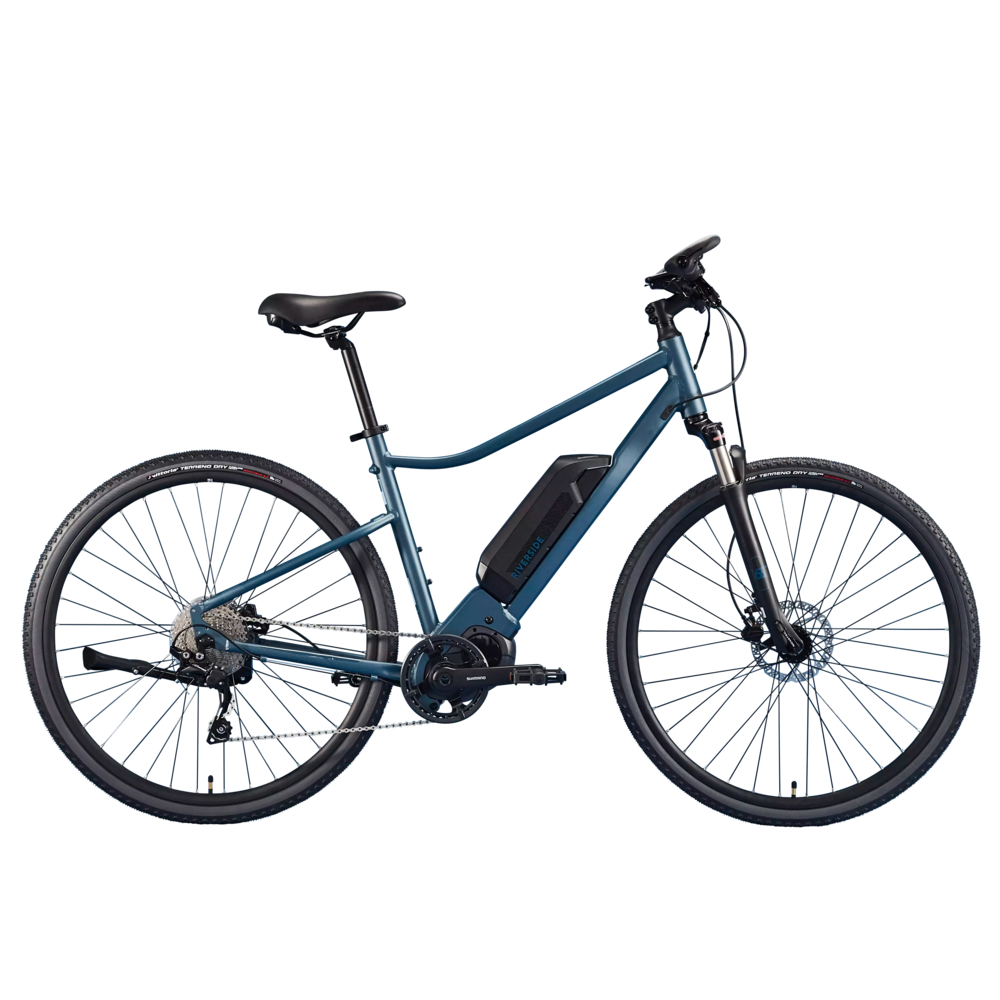
Unselected
RIVERSIDE 540e

Ref: 8614842

RIVERSIDE 540E BLUE GREY

2020

Ride further with smooth, responsive electric assistance, pace yourself with the help of the central motor, and give yourself that extra little push when you need it on rides up to 120 km.

Unselected
Unselected
Riverside 540e console

First use

X - "Mode" button

For shifting up through the modes (off => eco => norm => high)

Y - "Mode" button

For shifting down through the modes (high => norm => eco => off)

A - "Display" button

For changing the display (information visible on the screen)

1 - "Power" button

For turning your bike on or off

2 - "Backlight" button

For lighting up the display so that all the info is visible both day and night


Others: walking mode only turns on in "off" mode. Press button no. 2 for 2 seconds to switch on walking mode, release the button, then hold it down to push your bike forwards (release the button to stop the bike)
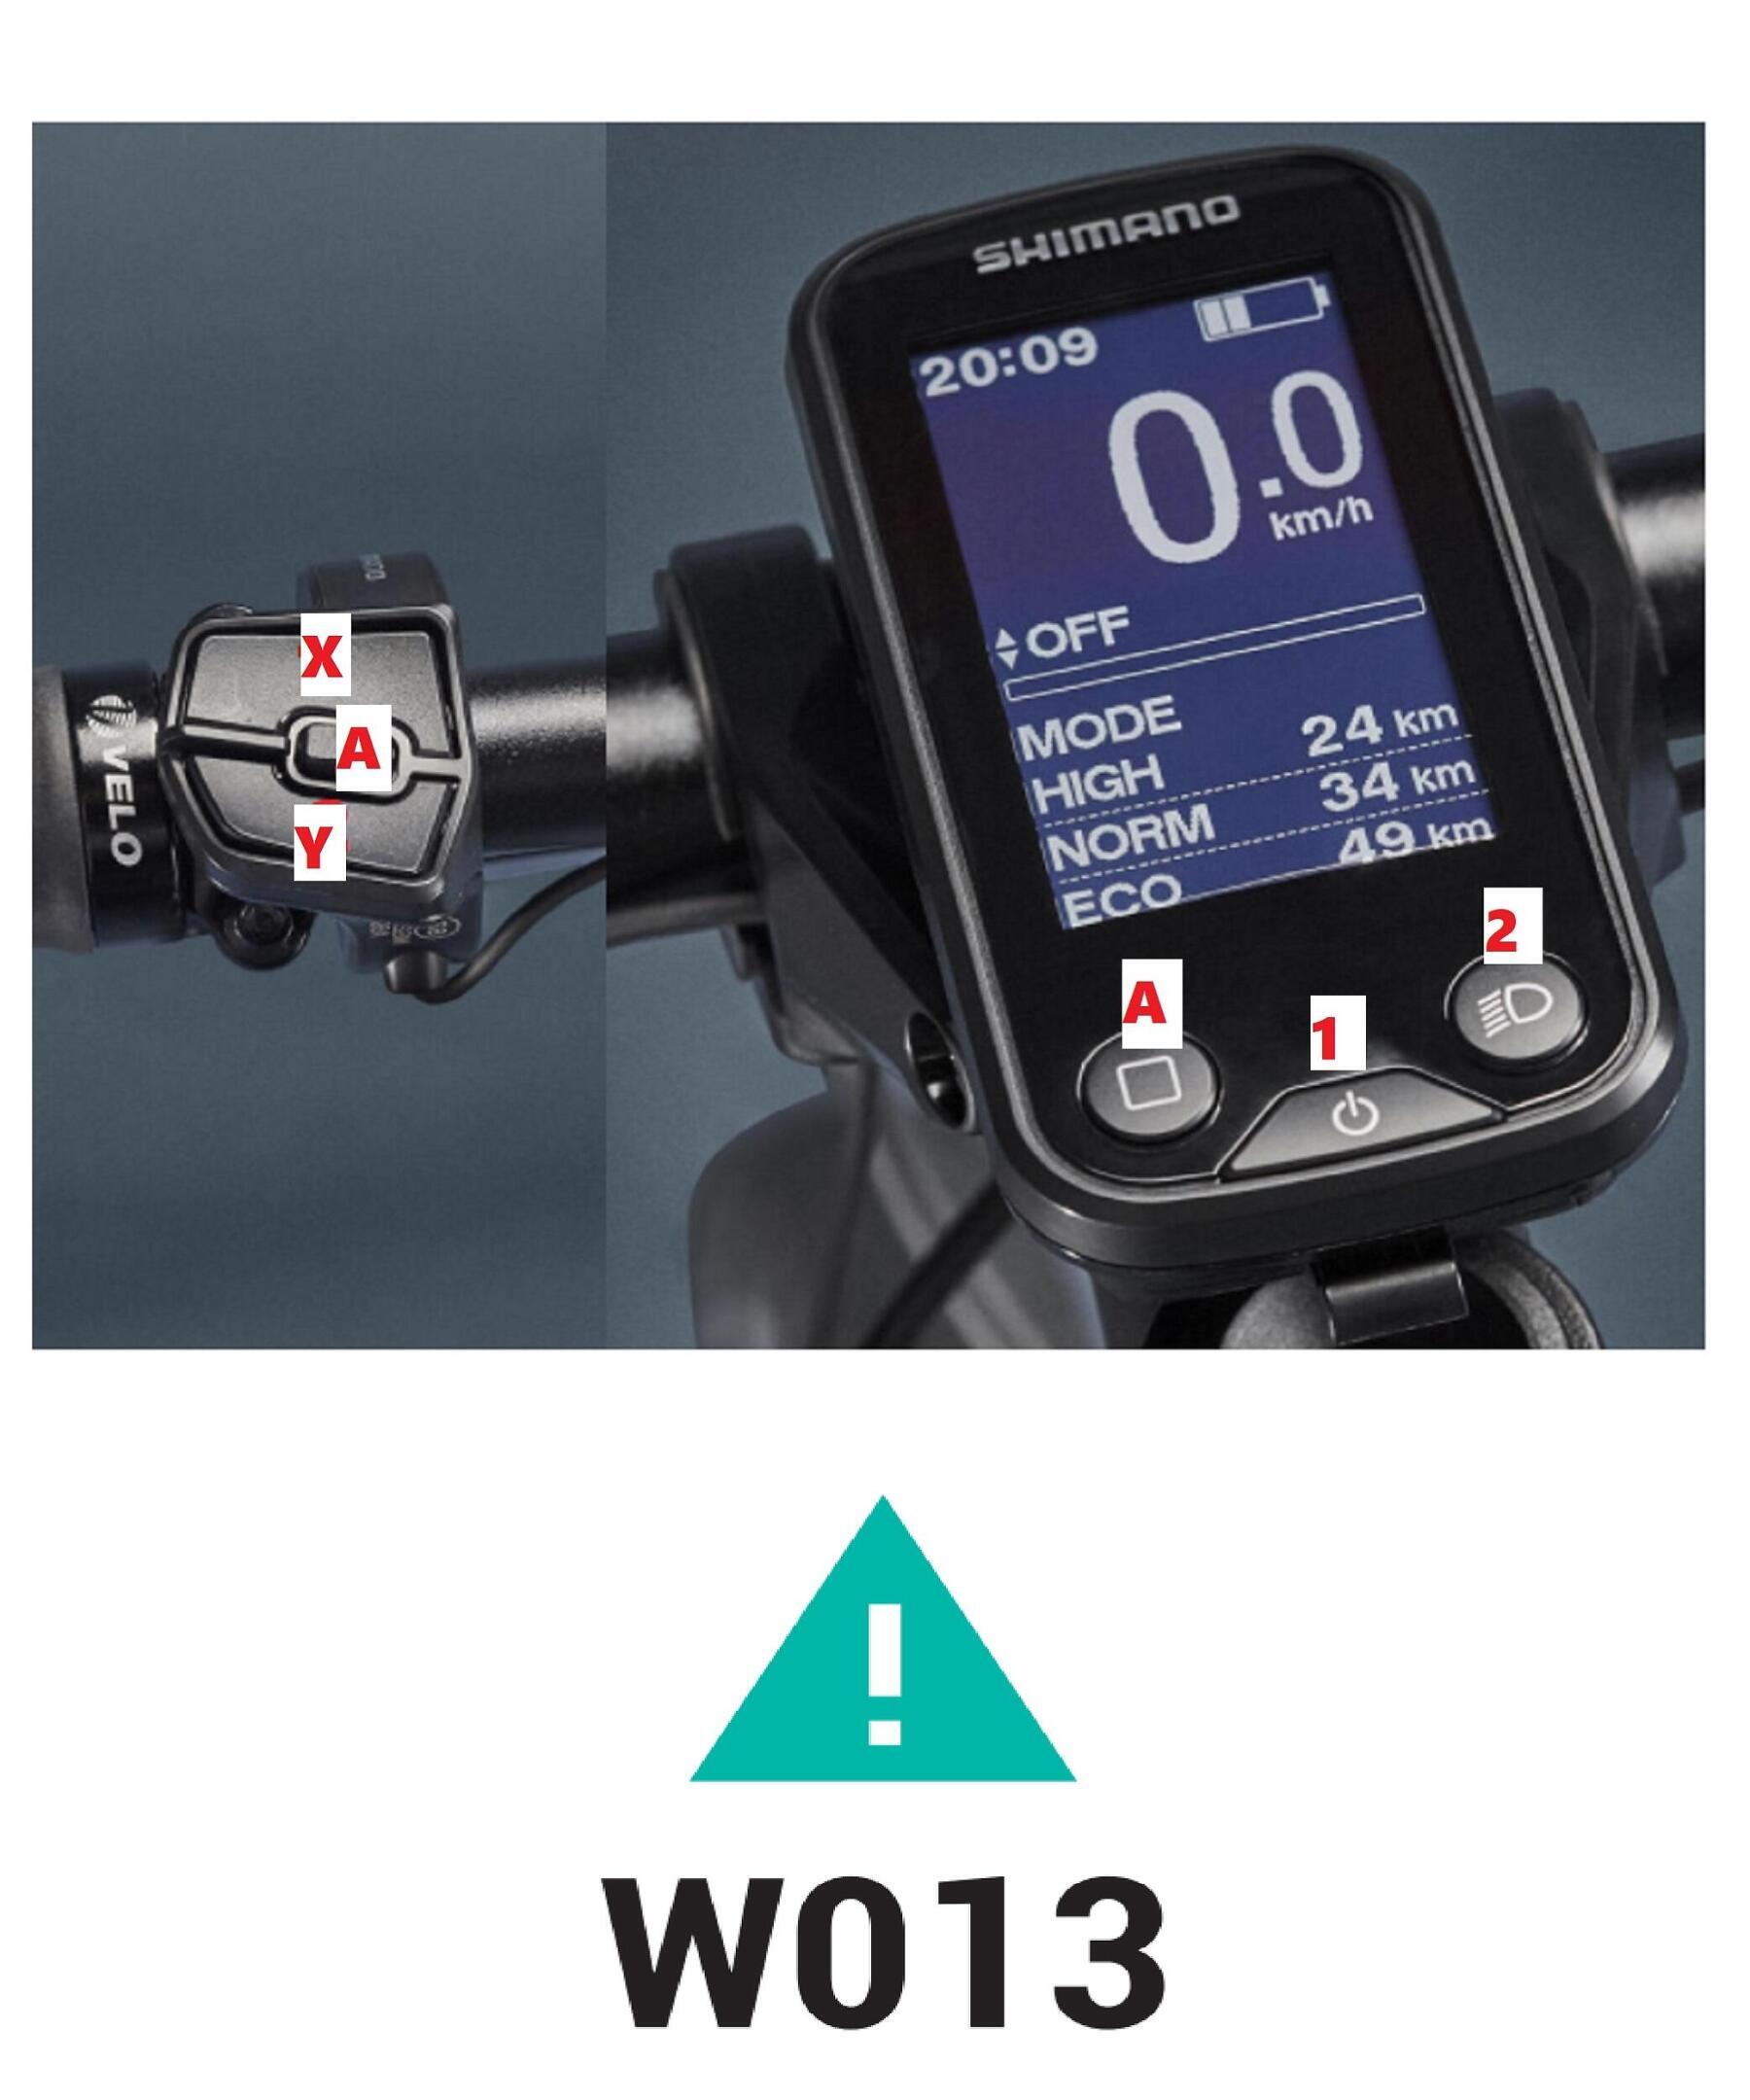
 

Error W013:

When your bike is turning on and the sensors are starting up, don't turn the pedals as this could cause error W013.

Unselected

Screens and functions

What happens if you forget to switch off your bike?

The bike turns off automatically after a few minutes if it isn't being used.

What is walking mode?

When you need to push your bike while walking alongside it, this mode takes some of the strain!

Please note: this mode should not be used when riding your bike. It can be activated by pressing button number "2" (button at the bottom of the remote control). This mode switches off when you release the button.


Never use walking mode while riding your bike as this may damage the motor.

Find out how to use this mode in the previous section (first use)

walk
What information is shown on the display?

1) Assistance mode

See which mode you're in (eco, norm, high)

2) ON/OFF button

Hold down to switch the bike's electric assistance on or turn it off.

3) Screen backlight button

Hold down to turn the screen's backlight on and off

4) Change display button

5) Journey stats:

You can navigate between stats by pressing the button or pressing button A on the remote control. DST: Distance covered. You can reset to zero when DST is displayed. Hold down the button, then press once when the DST stat flashes. ODO: Total distance MODE: Remaining battery for each assistance mode TPS: Journey duration MOY: Average speed MAX: Max speed

6) Assistance gauge:

Shows the level of assistance being provided based on the pedalling power. The harder you pedal, the higher the assistance.

7) Battery charge level:

6 levels and a percentage showing remaining capacity

8) Screen backlight icon

9) Time

10) Speed indicator


global
How much electrical assistance does each mode give?

Walking mode - Assistance when walking.

Off mode - Assistance deactivated.

Eco mode - Gentle assistance up to 25 km/h to offset the bike's weight - range of around 120 km in normal conditions.

Norm mode - Moderate assistance up to 25 km/h - range of around 100 km in normal conditions.

High mode - ""Boost" assistance up to 25 km/h when climbing more difficult hills - range of around 80 km (please note: prolonged use of the electric assistance will shorten your battery range considerably).


How do you get into settings? 

You can access settings by holding down buttons 1 and 2 at the same time. This menu lets you adjust the following:

- Time

- Default start-up assistance mode

- Backlight

- Screen brightness

- Control button sound

- Units

- Language

- Font colour

settings
How do i remove the screen of my bike ?

Screen theft can indeed be very common on removable screens. We recommend that you either: 
- take it with you every time you tie up your bike 
- lock the screen using the screw at the back (image opposite)

SCREENS AND FUNCTIONS
How to reconnect or disconnect one of the cables from my screen ?

If your display cables got disconnected during transport, you can easily plug them in yourself. 
To do this, all you need to do is take the cable connection tool 1. 
Once the cable is properly inserted in the tool, you can connect it to the screen support, in one of the holes provided for this purpose. (there is no order)

SCREENS AND FUNCTIONS
Unselected

Recharging the battery

How long does it take the battery to charge?

It takes three hours to charge the battery fully (from 0% to 100%).However, it only takes 2 hours to charge the battery from 0% to 80%.

Can you ride when your battery is flat?

It's an electric-assist bike. This means you can also ride it without assistance.

However, you may well notice the additional weight of the assistance system.

Can you leave the charger connected to the battery even if it's fully charged?

Yes, the charger and the battery can be left plugged in round the clock.

When the battery is fully charged, the charger stops charging.


Should you wait until your battery is completely flat before charging it?

No. Lithium-ion batteries have no memory effect and can therefore be charged at any time.

We recommend charging your battery after each ride to keep it working well.

Does the battery charge while cycling?

No, it doesn't have a dynamo. Some systems let you charge the battery as you ride or brake, but this doesn't generate much power.

Unselected

Battery life, storage, and range

What should you do with the battery when it wears out?

When your battery wears out, take it to your local Decathlon store, which will send it to a specialist facility to be recycled.

What is the lifetime of your battery?

The warranty on your battery is for 2 years or 1000 cycles (1 cycle = 1 full charge + 1 full discharge, or two 50% charges + two 50% discharges).

How should you store your battery?

You must store and charge your battery in a cool (between 10°C and 25°C), dry place, out of direct sunlight.

Do not store the battery for long periods if it is empty or below 10% charge as this may result in deep discharge and damage the battery.


You should charge the battery (even if it's not being used) at least once every three months to prevent deep discharge and loss of the battery's capacity.

Where can you buy a second battery?

You can buy a new battery from your local Decathlon workshop.

Contact your nearest workshop to find out whether they have the battery you need in stock and how long it will take to arrive.


Batteries can be bought online from our partner, Alltricks:

https://www.alltricks.fr/F-174393-composants-electriques/P-1647108-batterie_shimano_steps_bt_e8016_pour_tube_diagonal___630wh

This is a 630 Wh battery (the original one is 418 Wh). This battery gives you more range (around 20 km more per mode)

How long can you store your battery before you need to recharge it?

You can store your battery for up to six months without recharging, without degrading battery capacity. If storing it for longer than six months, you must fully charge it.

Why has the battery range on your riverside 540e decreased?

- Your bike will be more efficient and behave better with tyres inflated to between 4 and 5 bar

- The battery life will be lower in cold weather

- The battery range will be lower if the bike is overloaded

- The battery range will be lower when going uphill

- We recommend reducing the assistance mode when the battery level is low


Where can you buy a second charger?

You can buy a new charger from your local Decathlon workshop.

Contact your nearest workshop to find out whether they have the charger you need in stock and how long it will take to arrive.


Chargers can be bought online from our partner, Alltricks:

https://www.alltricks.fr/F-41479-accessoires-electronique/P-1567982-chargeur_de_batterie_shimano_steps_ec_e8004_1

Unselected

Accessories

Unselected

Electrical problems

Your battery won't charge

1. CHECK THE BATTERY, CHARGER AND MAINS CONNECTION


Make sure the charger you're using is the original charger provided by Decathlon.

Connect the charger to the battery and to a mains socket.

Orange charging LED constantly lit = the battery is charging (or it finished charging less than an hour ago)

Orange charging LED flashing = charge error => visit your Decathlon workshop to have the error diagnosed

Charging LED off = the battery is unplugged (or it finished charging more than an hour ago)

A completely flat battery will take 6 hours to fully charge.


2. CHECK THAT THERE IS NO DIRT ON THE CONNECTORS

The charger and battery connectors must be clean. There should be no dirt preventing contact between the battery and its charger.


3. THE LED INDICATOR LIGHTS ON THE BATTERY MAY BE DEFECTIVE

Drop in at one of our Decathlon workshops to have them checked and repaired.

One or more leds on your battery is/are flashing

1 - remaining battery charge: between 1% and 20% => charge your battery as soon as possible

2 - remaining battery charge: between 21% and 40%

3 - remaining battery charge: between 41% and 60%

4 - remaining battery charge: between 61% and 80%

5 - remaining battery charge: between 81% and 100%

6 - battery off

7 - system error. How can you resolve this? Check that the charger's cables are in good condition and are properly plugged in. If this doesn't solve the problem, visit your nearest Decathlon store

8 - Protection in the event of high temperatures. How can you resolve this? Let the battery cool down until its internal temperature has dropped enough. If this doesn't solve the problem, visit your nearest Decathlon store

9 - Authentication error. How can you resolve this? Check that the screen is properly plugged in. Check that the cables are connected. If this doesn't solve the problem, visit your nearest Decathlon store

10 - Charge error. How can you resolve this? Remove the battery charger and press the battery button. If this doesn't solve the problem, visit your nearest Decathlon store

11 - Battery malfunction. How can you resolve this? Connect the charger to the battery and plug it into the mains for a few seconds, then remove the charger. Put the battery onto the bike and start the bike by holding the battery button. If this doesn't solve the problem, visit your nearest Decathlon store

LED battery
The screen is showing an error code

For W0... errors, the message disappears once the error is resolved

- W011: Bike speed not detected

Make sure the speed sensor on the back wheel is correctly in place (the arrow on the sensor needs to be facing the magnet fixed to one of the wheel's spokes. See diagram below). If this doesn't solve the problem, visit your nearest Decathlon store

- W012: Crank mounted the wrong way around

Visit your nearest Decathlon store to have it repaired.

- W013: The torque sensor didn't start properly.

Turn the bike off and back on without turning the pedals.

- W020: System temperature too high

Turn of the electrical assistance until the temperature falls and returns to normal. If this doesn't solve the problem, visit your nearest Decathlon store

- W032: The derailleur that's installed is different to the derailleur configured in the settings.

Visit your nearest Decathlon store to have it repaired.


For E0... errors, if an error message appears on the screen, follow the procedure for the error code then restart the system by pressing the battery button.

- E010: system error

Hold the battery button to turn the battery off, then turn it back on. If this doesn't solve the problem, visit your nearest Decathlon store

- E013: Software anomaly

Visit your nearest Decathlon store

- E014: speed sensor is incorrectly installed

Visit your nearest Decathlon store

- E020: communication error between the screen and control unit

Visit your nearest Decathlon store

- E021: The battery connected to the drivetrain mechanism complies with the system requirements but has not been detected.

Press the battery button to turn it off, then turn it back on again.

- E022: The battery connected to the drivetrain mechanism does not comply with requirements.

Press the battery button to turn it off, then turn it back on again.

- E023: Electric fault inside the battery.

Press the battery button to turn it off, then turn it back on again.

- E024: Communication error with the bike's system.

Check that the cable isn't loose or incorrectly plugged in.

- E025: A message appears when there is no original drivetrain mechanism connected. This message appears if one of the cables is unplugged.

Connect a battery and an original drivetrain mechanism. Check the state of the cables.

- E030: The control part installed is not the same as the part configured in the system.

Visit your nearest Decathlon store

- E033: The current software is not compatible with the system.

Visit your nearest Decathlon store

- E043: Damaged software

Visit your nearest Decathlon store


The electric assistance is intermittent

1- CHECK THAT THE BATTERY IS CHARGED

If the battery is almost empty and the bike is set to a high assist mode, this can cause the bike to judder before the battery goes completely flat.

> Remove the battery from the bike.

> Press the battery button.

> Check that at least one LED lights up.

> If none of the LEDs light up, or the last LED blinks, charge the battery.

2- CHECK THAT THE BATTERY IS CLEAN, PROPERLY ATTACHED, AND LOCKED IN PLACE

> Check that the battery connectors and housing are clean and in good condition.

> The battery should be correctly inserted into its slot. (Make sure the lock is in the "open" position) 


If the problem persists, please contact us via the help form, or visit one of our Decathlon workshops.

Display does not turn on

1- CHECK THAT THE SCREEN IS PROPERLY PLUGGED IN

> Check the screen's connector, which can be found on the front of the handlebar.

> Check that both plugs are all the way in

> Check that none of the cables is kinked.

2- CHECK THAT THE BATTERY IS CHARGED

If the battery is almost empty and the bike is set to a high assist mode, this can cause the bike to judder before the battery goes completely flat.

> Remove the battery from the bike.

> Press the battery button.

> Check that at least one LED lights up.

> If none of the LEDs light up, or the last LED blinks, charge the battery.

3- CHECK THAT THE BATTERY IS CLEAN, PROPERLY PLUGGED IN, AND LOCKED IN PLACE

> Check that the battery connectors and battery housing are clean.

> The battery must be correctly inserted into the lower slot and the handle must be fully down (you should hear it click to confirm that it's in correctly).

4- LET THE SYSTEM COOL DOWN

In high temperatures, or after a long ride, the electric system may overheat. Allow the bike to cool down by not using the electrical assistance for several minutes before turning it back on.


If the problem persists, please contact us via the help form, or visit one of our Decathlon workshops.

The electric assistance is cutting off

1- CHECK THAT THE SCREEN IS PROPERLY PLUGGED IN

> Check the screen's connector, which can be found on the front of the handlebar.

> Check that both plugs are all the way in

> Check that none of the cables is kinked.

2- CHECK THAT THE BATTERY IS CHARGED

If the battery is almost empty and the bike is set to a high assist mode, this can cause the bike to judder before the battery goes completely flat.

> Remove the battery from the bike.

> Press the battery button.

> Check that at least one LED lights up.

> If none of the LEDs light up, or the last LED blinks, charge the battery.

3- CHECK THAT THE BATTERY IS CLEAN, PROPERLY PLUGGED IN, AND LOCKED IN PLACE

> Check that the battery connectors and battery housing are clean.

> The battery must be correctly inserted into the lower slot and the handle must be fully down (you should hear it click to confirm that it's in correctly).

4- LET THE SYSTEM COOL DOWN

In high temperatures, or after a long ride, the electric system may overheat. Allow the bike to cool down by not using the electrical assistance for several minutes before turning it back on.


If the problem persists, please contact us via the help form, or visit one of our Decathlon workshops.

The electric-assist doesn't engage

1- CHECK THAT THE SCREEN IS PROPERLY PLUGGED IN

> Check the screen's connector, which can be found on the front of the handlebar.

> Check that both plugs are all the way in

> Check that none of the cables is kinked.

2- CHECK THAT THE BATTERY IS CHARGED

If the battery is almost empty and the bike is set to a high assist mode, this can cause the bike to judder before the battery goes completely flat.

> Remove the battery from the bike.

> Press the battery button.

> Check that at least one LED lights up.

> If none of the LEDs light up, or the last LED blinks, charge the battery.

3- CHECK THAT THE BATTERY IS CLEAN, PROPERLY PLUGGED IN, AND LOCKED IN PLACE

> Check that the battery connectors and battery housing are clean.

> The battery must be correctly inserted into the lower slot and the handle must be fully down (you should hear it click to confirm that it's in correctly).

4- LET THE SYSTEM COOL DOWN

In high temperatures, or after a long ride, the electric system may overheat. Allow the bike to cool down by not using the electrical assistance for several minutes before turning it back on.

5- SELECT AN ASSISTANCE MODE

If the mode displayed on the screen is OFF, the motor will not deliver any electrical assistance. Use the remote control to select one of the assistance modes. When you have selected a mode, start pedalling hard. You should move to a higher assistance mode (HIGH being the highest) if you find that you are exerting too much effort on the pedals to obtain electrical assistance.

6- CHECK THE POSITION OF THE SPEED SENSOR MAGNET ON THE WHEEL

> Find the corresponding magnet attached to one of the spokes of the rear wheel.

> This magnet must be positioned facing the triangle marker drawn on the speed sensor.

> If this is not the case, reposition the magnet. To do so, unscrew the magnet using a crosshead screwdriver, place it in the correct position and tighten the screw to attach it to the spoke.


If the problem persists, please contact us via the help form, or visit one of our Decathlon workshops.

The electrical assistance isn't very effective

1- CHECK THE TYRE PRESSURE

 > The tyre pressure determines how efficiently the electric assistance works. Before each ride, make sure your tyres are inflated to between 3 and 4.5 bars.

2- CHECK THAT THE BATTERY IS CHARGED

If the battery charge level is low, the motor won't receive enough power to deliver the desired assistance level. In this case, switch to a lower electrical assistance mode.

3- CHECK THAT THE BATTERY IS CORRECTLY PLUGGED IN

If the motor seems to judder, check that the connector to the motor is fully and securely plugged in.

4- BE CAREFUL NOT TO OVERLOAD THE BIKE


If the problem persists, please contact us via the contact form, or visit your local Decathlon workshop.

Unselected

Care, maintenance, and spare parts

How to clean your riverside 540e

When cleaning your Original 920 E, leave the battery CONNECTED to the bike. This will help prevent water from getting into the controller.


Do not use a pressure washer as water could get into the ball bearings and permanently damage the electrical components!


Wash your bike with a hose and a sponge (cleaning kits are available at Decathlon).

Dry your bike with a cloth

Lubricate your chain with a suitable lubricant 

How to correctly store your riverside 540e

> Store your bike in a place that is cool and sheltered.

> Before you put it away, clean your bike to remove mud or sand that could corrode your bike.

> Lubricate the chain: spray lubricant along the full length of the chain to protect it from corrosion.

> Shift the derailleur to the smallest cog.

> Fully charge the battery at least once every six months (more often is better).

What pressure should your tyres be inflated to?

Having the right tyre pressure is particularly important on an electric bike. The wheels have a lot of weight on them because of the combination of the motor and bike.

To reduce the risk of punctures and ensure you get the greatest battery range possible, we recommend you inflate your tyres to a pressure of between 3 and 4.5 bar.

How to bed in your disc brakes

To get your brakes in peak condition, you will need to bed them in. When your bike leaves the shop with its shiny new brake pads and discs, their braking power is weak. This takes about 10 braking actions per brake. The bedding-in process involves getting up to a speed of 25 km/h and then applying just one of the brakes firmly to reduce your speed to 5 km/h, without locking the wheel.

Need a replacement key?

Find out how to get a replacement key

Key
Unselected
Spare parts

Ordering spare parts for your bike

NEED SPARE PARTS FOR YOUR RIVERSIDE 540E?

Unselected

Warranty

Riverside guarantees your bike's frame, handlebar and stem for life (under normal conditions of use).

The warranty on your bike's other components is for two years (other than normal wear).

As soon as you start using the bike, some components will move slightly. This is why we offer a free maintenance check and tune-up of your Riverside bike within six months of purchase. 

Unselected
RIVERSIDE 540E BLUE GREY

Haven't been able to fix your problem or find what you need?

Please contact one of our technicians who will be happy to help