ROCKRIDER E-ST 520 MOUNTAIN BIKE

Ref: 8556616

ROCKRIDER E-ST 520 27.5"+ ELECTRIC MOUNTAIN BIKE - GREY/YELLOW

2019

This electric mountain bike is designed for RIDING ON ANY MOUNTAINOUS TERRAIN.

With the E-ST 520 electric mountain bike and its 70 Nm central motor, you can climb any mountain.

Presentation of the rockrider e-st 520

First use

Inflating the original tyres (tube-type)

Having the right tyre pressure is particularly important on an electric bike.
The wheels have a lot of weight on them because of the combination of the motor and bike.

For the original tube-type tyres, which have an inner tube:

To reduce the risk of punctures and ensure your bike can achieve its maximum range, we recommend you inflate your tyres to a pressure of between 1.0 and 1.8 bar.

If you'd like more grip and comfort, you can drop the pressure. If you'd like a longer battery range and more efficiency, you can inflate your tyres a little more.

Be careful not to exceed the maximum AND minimum pressures indicated on the tyre's sidewall.

If the pressure is too low, you can get pinch punctures in the inner tube or damage the rims when you hit a hard object. On the other hand, too high a pressure can make the inner tube or tyre burst, and can permanently warp the rim.

A well-inflated tyre is essential for your sport. So remember to frequently check your tyre pressure.

INFLATING-YOUR-TYRES-ROCKRIDER-ST540-MOUNTAIN-BIKE

Inflating your tubeless tyres

Tubeless is a great way of getting the most out of your tyres. The pressure is lower (by about half a bar) than with tube-type tyres. As it's less inflated, the tyre's "carcass" will be able to come into contact with the floor. And it won't be stopped by the inner tube.

With a tubeless set-up, the aim is to lower the pressure to get the most out of the tyre without the rim touching the floor as you go over obstacles.

Make sure not to inflate your tubeless tyres above 3 bars, as your carbon rims could get damaged.

A well-inflated tyre is essential for your sport. So remember to frequently check your tyre pressure.

NB: Unlike your rims, your Hutchinson Cougar tyres aren't tubeless ready.

First use
Adjusting your fork

Your Rockshox fork needs to be set up according to your riding style, the terrain and your preferences, but most importantly according to your weight.

Your fork has just two settings that can be adjusted: the preload and the rebound.

The preload determines how hard your fork is. To adjust it, turn the dial that sits on the left of your fork. Turning it clockwise will tighten the spring and make the fork harder. Turning it anticlockwise will loosen the spring and make the fork softer. The dial on the right is used to lock out the suspension, which can be handy on particularly bumpy trails.

The rebound determines the speed with which the suspension returns to its initial position after cushioning an impact. If the rebound is too fast, it can "bounce" your fork, making you lose grip and control. If the rebound is too slow, it can squash the fork and gradually increase its travel. To adjust the rebound, turn the dial that sits just under the fork's right blade.

ADJUSTING YOUR FORK
Bedding in your brakes

When your bike leaves the shop with its shiny new brake pads and discs, their braking power is weak. A sharp prolonged braking action (for example, during a descent) with brakes that have never before been used can cause the pads to overheat and to "glaze over".

To ensure that your brakes perform, we recommend that you bed them in. This takes about 10 gentle braking actions per brake. For each braking action, apply a single brake to slow the bike down from about 25 km/h to 5 km/h without fully blocking the wheel. Repeat with the other brake.

If you can see a thin, shiny layer on the top of your brake pads, this probably means that they're glazed. To avoid having to throw them away, you can deglaze them by sanding them lightly with some relatively fine sandpaper (P120). Remember to wear gloves and a mask when sanding your brake pads. Then simply remount your brake pads and bed them in again.

BEDDING IN YOUR BRAKES
Adjusting the height of your handlebars

Your handlebar is set to the most raised position, which is the most comfortable position for riding.

For improved aerodynamics and more efficient pedalling, you can lower your handlebar so that your body leans forward and adopts a more racing-like position.

Follow the steps in this video to move the headset spacers below the stem and lower the handlebars on your bike.

ADJUSTING THE HEIGHT OF YOUR HANDLEBARS

Aligning your handlebar

Correct handlebar alignment will prevent arm and shoulder pain as well as improving your mountain bike experience in general. Check out this video to learn how to align your handlebars.

ALIGNING YOUR HANDLEBAR

Positioning your brake levers

It's important to correctly position your brake levers so that you can ride safely and comfortably. Check out this video to learn how to orient your brake levers.

POSITIONING YOUR BRAKE LEVERS

Fitting your gps

Your mountain bike is compatible with our bike computer stem bracket. You can use it to mount your Garmin or Sigma GPS device or cycle computer.

NB: If you use spacers on top of your stem, the bracket won't sit correctly and you'll need to slightly "cut back" the spacer. If your spacers are below the stem, the bracket will sit correctly.

FITTING YOUR GPS

Adjusting the height of your saddle

The right saddle height makes you more comfortable and more efficient. 

Start by standing next to your saddle. Tilt the quick-release lever to unlock it. Pull the saddle up or push it down to bring it level with your pelvis. Tilt the lever again to lock it. To make sure you get it right, take a look at our tutorial video.

ADJUSTING THE HEIGHT OF YOUR SADDLE

Adjusting the tilt of your saddle

Adjusting your saddle's angle will make you more comfortable and more efficient. Check out this video to learn how to adjust the angle of your saddle.

ADJUSTING THE TILT OF YOUR SADDLE

Changing your pedals

Watch this video to learn how to change your pedals. 

If you use clipless pedals, practise clipping in and out so that you're ready in case you take a tumble. 

CHANGING YOUR PEDALS

How to convert your wheels to tubeless

To reduce the risk of your inner tube being punctured or pinched, and to improve grip and comfort, you may want to consider making your mountain bike wheels tubeless.

Your wheels are tubeless ready, which means that the rim-sealing tape is already in place. All you need is a pair of tubeless-ready tyres, some tubeless valves (Presta) and some sealant (puncture-proofing liquid). Remember to wear gloves and goggles to protect yourself in case you get a blowout.

To go tubeless, follow these steps:

1. Take the wheel off
2. Take the tyre and inner tube off the wheel
3. Check that the rim tape is properly stuck on and that there aren't any bubbles or tears
4. Insert a tubeless valve through the rim hole (from inside the rim)
5. Add 60 to 90 ml of sealant (depending on the tyre width)
6. Install your new tubeless-ready tyre
7. Inflate the wheel quickly to ensure that the tyre sticks to the rim.
Be careful not to exceed a pressure of 3 bars as this could burst the tyre and damage your rims.

If it seems too tricky, just visit your nearest Decathlon workshop and ask them to do it for you.

ROCKRIDER E-ST 900 ELECTRIC MOUNTAIN BIKE - ORANGE

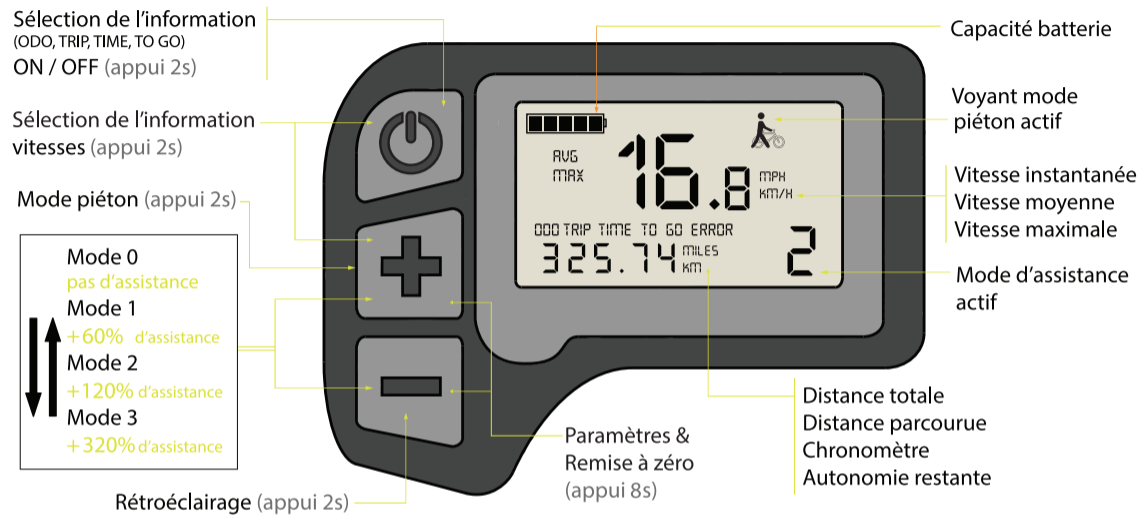
Controlling your screen

Your Brose Comfort screen has several buttons and a central joystick.

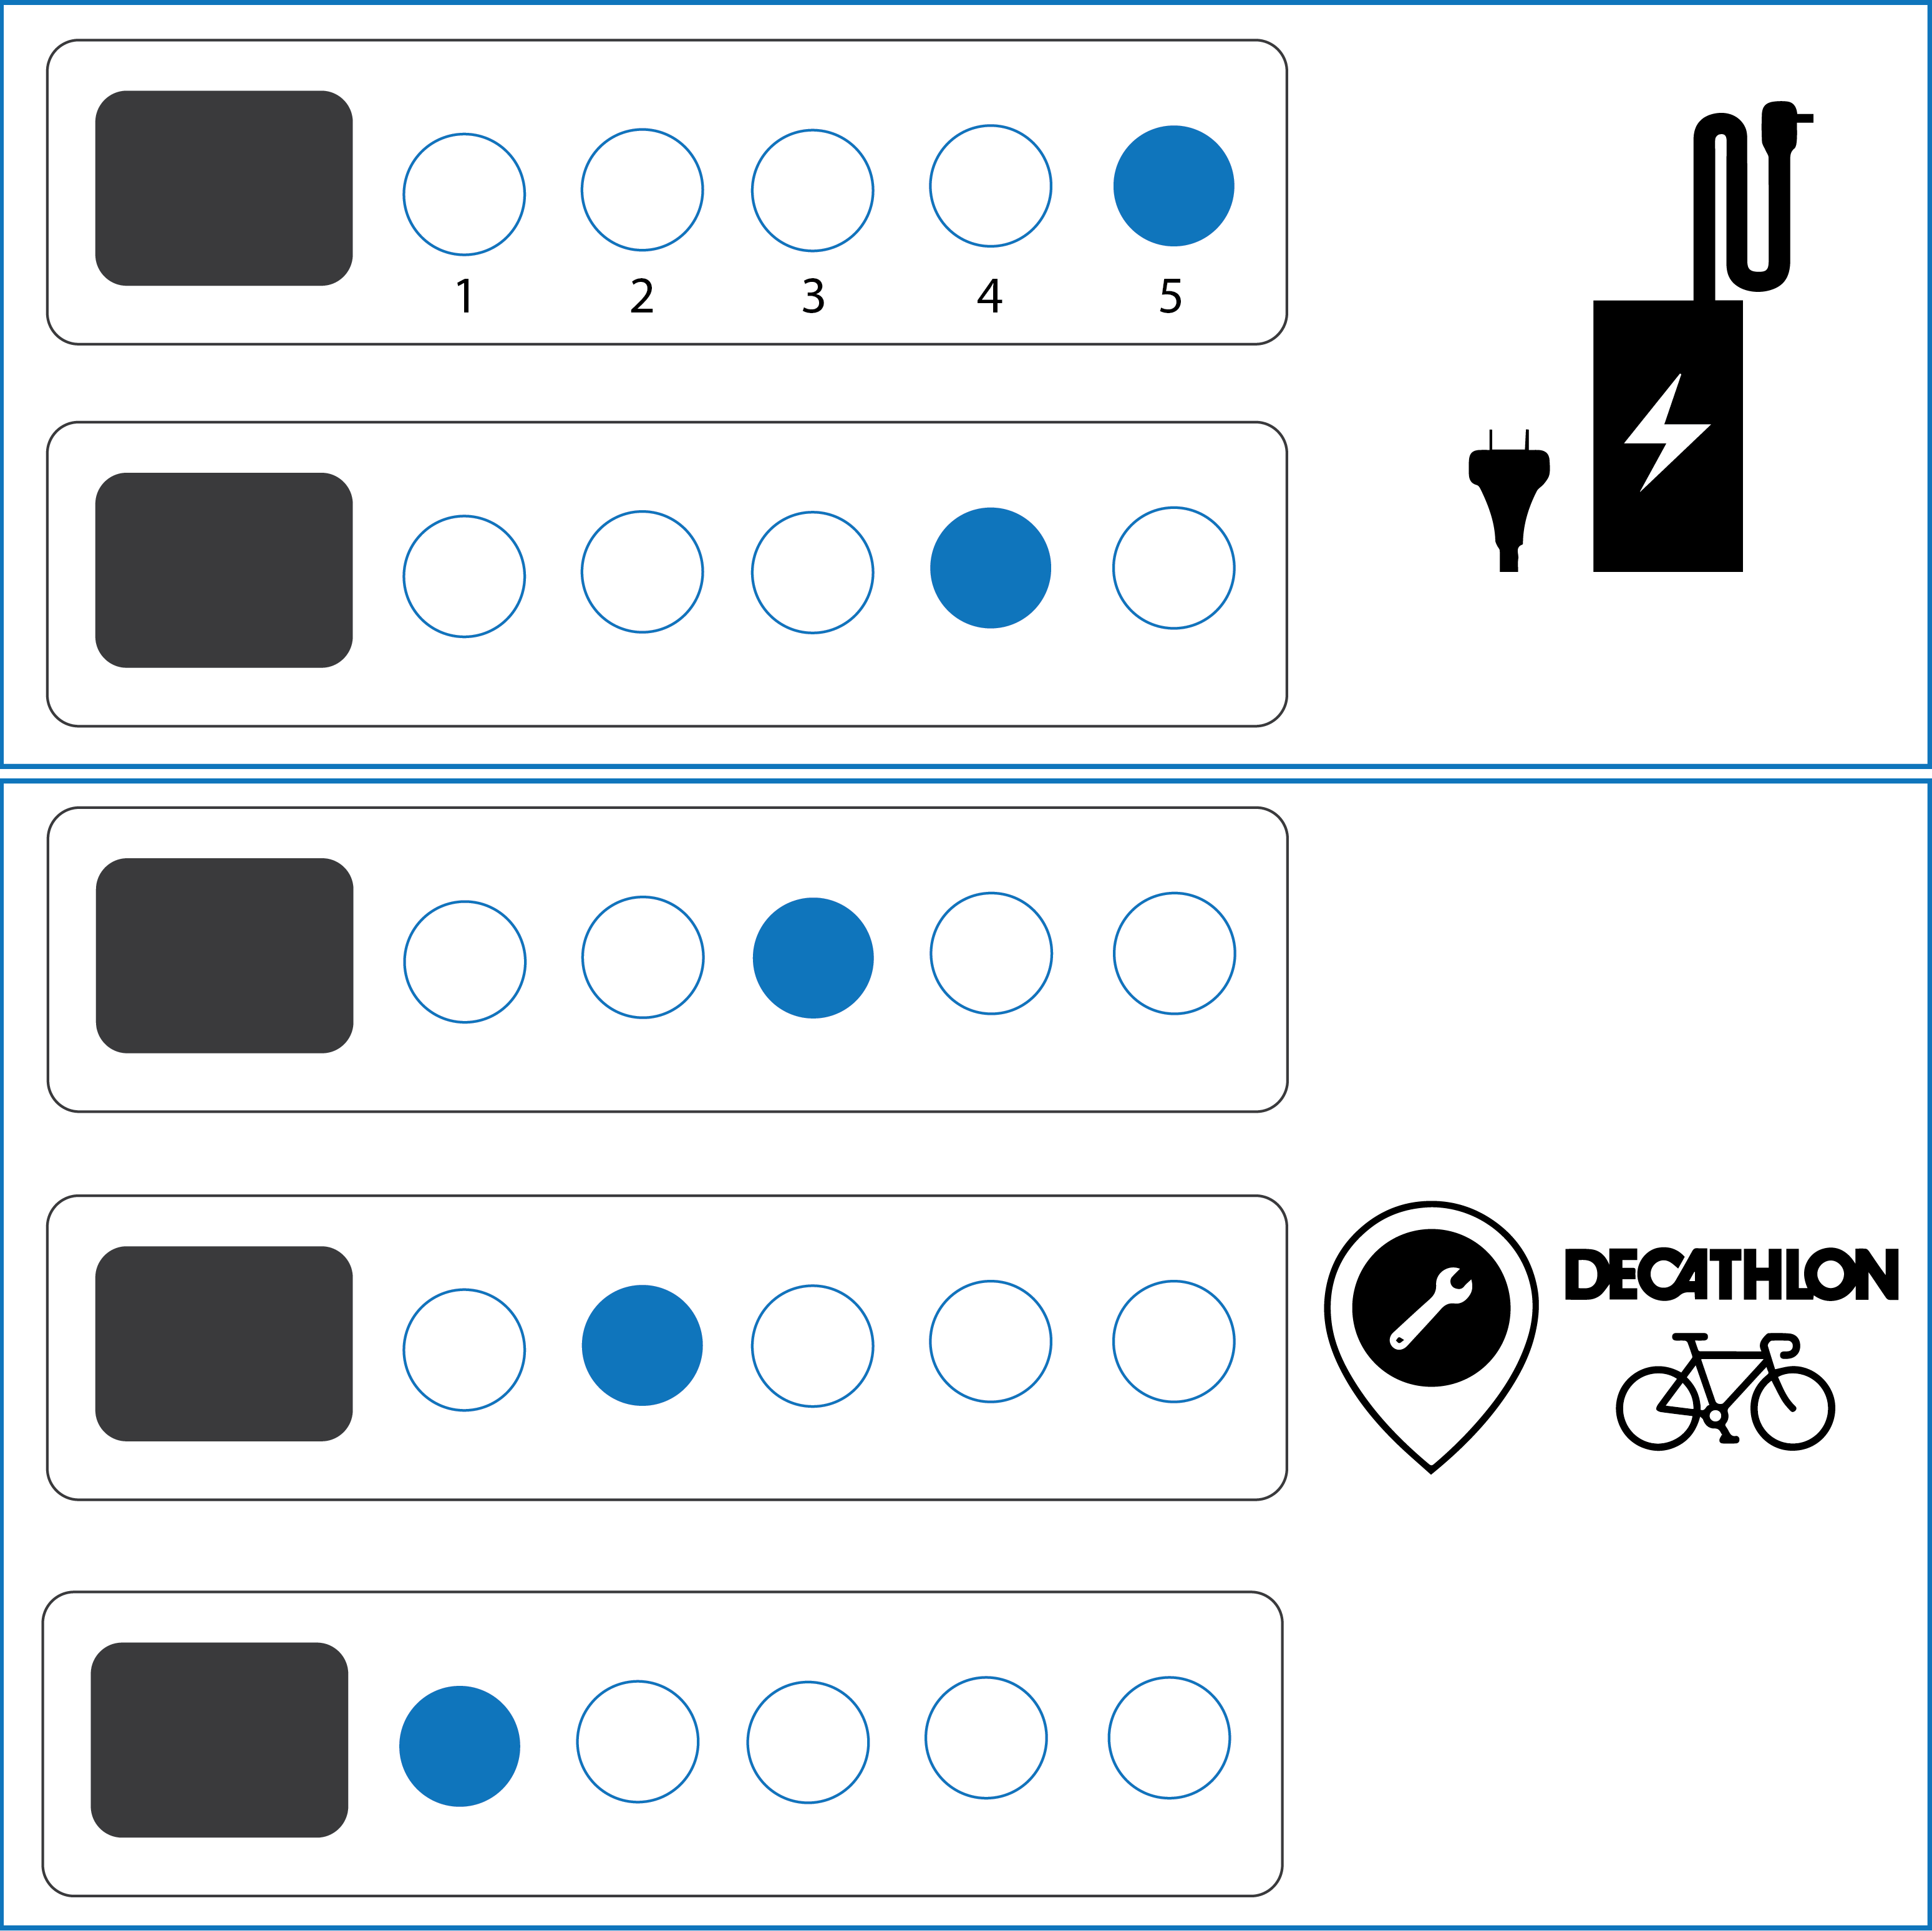
The start/stop button lets you turn the screen on and off. Use the + and - buttons to toggle between the different assistance modes:

Mode 0 - Off
Mode 1 - Economy (+60%)
Mode 2 - Normal (+120%)
Mode 3 - Boost (+320%)

From each assistance mode except for mode 0, hold down the + button to launch walk mode. This feature helps you push your bike when walking.

Your mountain bike doesn't have any lights, so the lights button won't do anything. If you do press this button, you can turn it off again by holding it down.

Got a question about your battery? 

How long does it take the battery to charge?

It takes three hours to charge the battery fully (from 0% to 100%).

Can you ride when your battery is flat?

It's an electric-assist bike. This means you can also ride it without assistance.
However, you may well notice the additional weight of the assistance system.

Can you leave your charger connected to the battery even after it has finished charging?

To avoid any electrical hazards, we advise against leaving your bike/battery plugged into the mains for more than 24 hours.
When the battery is fully charged, the charger stops charging. The LED light on the charger turns green when the battery is charged.

Should you wait until your battery is completely flat before charging it?

No. Lithium-ion batteries have no memory effect. They can therefore be charged at any time.
We recommend charging your battery regularly to keep it working well.

Does the battery charge while cycling?

No, it doesn't have a dynamo. Some systems let you charge the battery as you ride or brake, but this doesn't generate much power.

What should you do with the battery when it wears out?

When your battery wears out, take it to your local Decathlon store, which will send it to a specialist facility to be recycled.

How should you store your battery?

You must store and charge your battery in a cool (between 10°C and 25°C), dry place, out of direct sunlight.
To avoid deep discharge, which may cause it to malfunction, do not put the battery away when less than 10% charged.
Ideally, charge the battery to 60% and recharge it (even if it's not being used) at least once a year to prevent deep discharge and loss of the battery's capacity.

Where can you buy a replacement battery?

You can buy a new battery from your local Decathlon workshop.
Contact your nearest workshop to check on availability and order times.

What is the lifetime of your battery?

The warranty on your battery is for 2 years or 500 cycles (1 cycle = 1 full charge + 1 full discharges, or two 50% charges + two 50% discharges). Up to these 500 cycles, we guarantee that the battery life will always be at least 80% of a new battery's life.

equipment-mountain-bike-st520-rockrider

The right equipment in case of a hiccup

You need to have the right equipment with you when you're out and about on your mountain bike so that you can take care of a puncture, a broken chain or any other type of setback. Here's a selection of products that can get you out of a tight spot or two.

Have a problem?

> ELECTRICAL

Your battery won't charge

1. CHECK THE BATTERY > CHARGER > MAINS SOCKET CONNECTION
> Make sure the charger you are using is an original one provided by Decathlon.
Connect the charger to the battery and to a mains socket.
Red charger light = the battery is charging.
Green charger light = the battery has finished charging.
Flashing charger light = there is a problem with the battery or charger.
A completely drained battery will take 6 hours to charge fully.

2. CHECK THAT THERE IS NO DIRT PREVENTING CHARGING
The charger's and the battery's connectors should be clean. There should be no dirt preventing contact between the battery and its charger.

3. THE LED INDICATORS ON THE BATTERY MAY BE FAULTY
Visit a Decathlon workshop to have them repaired.

One or more leds on your battery is/are flashing

THE LAST LED (furthest from the battery button) IS FLASHING.
Your battery is almost flat and needs to be charged. Plug your battery into the charger.

 THE 4TH LED IS FLASHING
Your battery's voltage is low and it has not been charged for a long time. Plug it in as soon as possible to stop it going into deep discharge, which could affect its capacity.

ANOTHER LED IS FLASHING 
Your battery has suffered an abnormal event that has caused it to malfunction. This malfunction may be temporary or permanent. Please visit any Decathlon workshop to have a diagnostics test run on your battery and bike.

LED battery
The screen is showing an error code

An error code may appear on your screen.

All error codes are listed in the electrical user guides. There are instructions on how to resolve each error code.

If the problem persists or if you're unable to resolve it, please visit one of our Decathlon workshops to have it repaired.

Low or reduced range

1. Make sure you are following the recommendations for using and storing your bike.
Your electric bike's range depends on a number of factors:
> THE LOAD ON THE BIKE: The range will be reduced if the bike is carrying too much weight.
> THE TYPE OF ROUTE: The range is reduced on climbs.
> THE TYRE PRESSURE: The battery will last longer with tyres that are correctly inflated.
> THE OUTDOOR TEMPERATURE: The range is lower in colder weather (up to 50% less).
> THE ASSISTANCE MODE USED: We recommend reducing the assistance mode when the battery is running low.
> FOLLOWING THE INSTRUCTIONS FOR CHARGING AND STORING YOUR BATTERY

2. An old battery can have reduced performance.
The distance you can travel will therefore be reduced. Visit your Decathlon workshop to give your battery a check-up.

> MECHANICS

Your wheel is buckling after several rides

When you start using your new bike, lots of its parts are going to wriggle around as they settle into place.

One such part is the spokes, which can sometimes be heard pinging. This is caused by the residual twist from assembly.

Your wheels should not be buckled in any way at all. If they are, let your local Decathlon workshop know when you take your bike for its free service (six months after purchase) so that they can adjust it for you.

WheelBuckling
Your gears are not shifting properly

There are several things you can do to ensure your rear gears shift properly:

1. Check the cable and its housing:
1a. Housing ends that are out of position can obstruct the derailleur cable when it is being pulled and prevent the gears from shifting smoothly. If a housing end is out of position, push it back into place.

1b. If the derailleur is not moving even after you squeeze and release the gear lever, it probably means that the cable and its housing have seized up. You will need to have the cable and housing replaced.

You can take your bike to a Decathlon workshop to get your cable and housing replaced, or you can do it yourself by following this video. The only difference between the video and your bike is that you have a single housing going from the shifter, under the frame's down tube, and down to the derailleur.

2. Check that the derailleur hanger isn't bent:
A bent hanger causes the derailleur to be out of alignment and therefore unable to function correctly. Stand behind your bike and check the alignment of the derailleur.

If the dropout is twisted or broken, take your bike to a DECATHLON workshop to have it replaced.

REMEMBER: you can have all the settings on your bike checked for free within six months of purchase.

NB: If you regularly ride your MTB in wet or muddy conditions, or if you regularly wash your bike with lots of water, then your cables and cable housing will need to be replaced more frequently. Washing your bike using a high pressure hose is highly discouraged as it can push dirt and dust into the cable housing.

Lost key

If you have lost both keys to your bike, please visit a Decathlon workshop to have the lock on the bike changed. You'll be given two new keys to go with the lock.

Locking your ST900

Maintaining your mountain bike

Servicing your bike will keep all of its parts working for as long as possible and ensure you have the most fun when riding. Aside from the aesthetic aspect of having a clean bike, failing to service it can lead to problems, and problems lead to accidents: jammed cables, rust, leaks, premature wear, etc.

Good maintenance is good for your performances, while your bike's parts will also last longer, which means a lower environmental impact.

As soon as you start using the bike, some components will move slightly.
This is why we offer a free tune-up of your mountain bike within six months of purchase

How to clean your e-st 520

To clean your bike properly, you'll need some bike cleaner, a sponge and a brush.

Rinse off the bike with a hose and apply the bike cleaner. Next, use the sponge and brush to work the cleaner in. It's essential to give the bike cleaner some time to act before rinsing the bike off.
When hosing the bike off, make sure you do so from a few steps away so as not to damage the mechanical components.
Lastly, dry your bike using a soft, clean cloth.

When cleaning your electric mountain bike, it's important to leave the battery on the bike. This will stop water finding its way into the connectors!
Do not use a pressure washer as water could get into the ball bearings and permanently damage the electrical components.

How to correctly store your rockrider e-st 520

It's vital to store your mountain bike correctly as this will make it last longer. It's even more important if you have an e-bike.

After your ride, we recommend:
> Cleaning your bike to remove any mud and sand that could damage it.
> Drying and lubricating your drivetrain (don't get any on the brakes) to protect it from rust.
> Keeping your bike in a cool, dry place.

If you won't be using your bike over winter, there are a few other things to do as well:
> Put the derailleur on the smallest cog to lower the tension on the cables.
> Charge the battery, ideally to 60%.
> You might want to cover your bike with a thin layer of petroleum jelly, particularly the spokes, hubs, rims, handlebar and stem. Rub the jelly on using a clean cloth. This will protect your bike's components from dust.
> Hang your bike by its frame to limit the pressure on the tyres and avoid potential cracks.

IMPORTANT: Cool doesn't mean cold! Avoid very high and very low temperatures at all costs. Don't leave your bike in the sun, and watch out for frost over winter.
A garage can be a good option, provided that it stays dry and doesn't freeze in winter. If it does, bring your bike inside your house.

STORING YOUR ROCKRIDER E-ST 900 CORRECTLY
Improving your battery's lifespan

To make your battery last as long as possible, we recommend:

- Using it less (a mountain bike isn't a scooter!)
- Charging your battery with the original charger and making sure the charger is in good condition
- Storing your bike with a battery charge level of around 60% (don't leave the battery plugged in when it's at 100% and don't store it when completely drained)
- Keeping your bike in the shade or in a cool room.

When transporting your bike by car, you might want to remove the battery and keep it inside your vehicle.

IMPROVING YOUR BATTERY'S LIFESPAN
Changing the brake pads

With disc brakes, you'll need to change your brake pads frequently. The level of wear on your brake pads will be affected by how much you use your brakes. 

If you don't feel like the brakes are biting, if they aren't working well, or if they're grinding, your brake pads might be worn. To be sure, check the inside of the pads. If there's less than a couple of millimetres left, they need replacing.

You can change your brake pads yourself by following the instructions in this video, or you can take your bike to a Decathlon workshop where one of our technicians will be happy to replace them. 

ROCKRIDER E-ST900 electric mountain bike
Servicing your fork

The fork is one of the mountain bike components that works the hardest, so it needs thorough maintenance to keep you safe and comfortable on technical trails. We therefore recommend giving it a regular check-up.

There are several thing's you'll need to do to keep your fork going for as long as possible:

After each ride, clean any dirt off the dampers and dust seals. This will minimise the risk of dirt getting into the blade. You can also add PTFE lubricant to stop the seals drying out. Wipe off any excess as you don't want it to pick up dust.

> After 50 hours of riding, take your fork off, give it a thorough clean and grease it again. This job is slightly trickier as it involves removing the fork. We recommend dropping off your mountain bike at one of our Decathlon workshops to get this done without the risk of damaging your fork.

ROCKRIDER E-ST900 electric mountain bike
Checking chain wear

A worn chain will struggle to change gears and will wear out the cassette and chainring prematurely.

You can check how worn your chain is by using a wear indicator. Simply place the indicator's notch between two links and let the other end drop onto the chain. If it fits neatly between two links, the chain is worn and it's important to change it soon, before it damages the cassette and chainring.

We recommend changing your chain when it's 50% worn. Above 75%, you should change the chain, cassette AND chainring, which is why it's best to regularly change your chain: this means you don't have to replace your entire drivetrain.

If you're using your electric mountain bike for travelling around town, try to use all of the cassette's cogs or a gentler assistance mode. Often, users have to change their entire cassette even though only the small cog has worn out. This premature wear is caused by using too powerful an assistance mode or using the small cog much more than the others.

REMEMBER: electric mountain bikes need a stronger chain.

ROCKRIDER E-ST900 electric mountain bike

Compatible accessories

ROCKRIDER E-ST 900 MOUNTAIN BIKE
500 Bottle cage

Fit the 500 bottle cage to your E-ST 520 mountain bike's top tube

ROCKRIDER E-ST900 electric mountain bike
Thule easyfold bike rack

Your bike is compatible with the Thule EASYFOLD bike rack available in Decathlon stores.

This bike rack can hold up to two electric bikes.

Bike rack
Lights

Your E-ST 520 mountain bike does not come with lights. However, you can fit it with a 6V light provided that it's listed as being "compatible with the Brose T aluminium motor" or 6W at the front and 0.6W at the back.

Our engineers recommend Lezyne, whose products are great value for money.

Remember to check the compatibility!


Please note: In most cases, lights manufacturers supply their lights/cables without connectors. You often therefore have to cut the cable to the right length, strip it, solder it or attach it using a terminal block, and then protect it with electrical tape or a heat-shrink sleeve.

SRAM-CASSETTE-10S

Spare parts

Need to replace a part on your bike? You'll find all our spare parts for the E-ST 520 MOUNTAIN BIKE right here.

Instructions and certificate of compliance

ROCKRIDER E-ST900 electric mountain bike
instructions diagram

Need the mechanical instructions for your E-ST 520 mountain bike? 

Certificate of conformity

Need the certificate of conformity for your E-ST 520 mountain bike? 

instructions diagram

Need the electrical instructions for your E-ST 520 mountain bike? 

INSTRUCTIONS AND CERTIFICATE OF COMPLIANCE

Need instructions for your fork? 

INSTRUCTIONS AND CERTIFICATE OF COMPLIANCE

Need instructions for your brakes?

INSTRUCTIONS AND CERTIFICATE OF COMPLIANCE

Need instructions for your drive train? 

ROCKRIDER E-ST 520 ELECTRIC MOUNTAIN BIKE

Haven't been able to fix your problem or find what you need?

Please contact one of our technicians who will be happy to help

ROCKRIDER E-ST900 electric mountain bike

Our commitments

ROCKRIDER provides a lifetime warranty on the frame, handlebar and stem of your mountain bike (under normal conditions of use).

All other parts have a two-year warranty.

When you start riding your bike, some components will move slightly. This is why we offer a free tune-up of your mountain bike within six months of purchase. 

Your feedback matters!

Whether it's good or bad, we want to know. Here's why your feedback is so important:

  • ROCKRIDER E-ST900 electric mountain bike

    To have your say at any
    time

    Your feedback tells us how you feel about the quality of our products!

  • Your feedback matters!

    To help other sports users

    Your feedback helps other customers decide which product is right for them!

  • Your feedback matters!

    To help improve our products

    We use your feedback to improve the design of our new products!